In this video I’ll show you how to use the Photoshop 3D Bridge in DAZ Studio 4.9.
It’s a little clunky and a little old school, but it can still be a helpful tool to either render a scene from DAZ Studio directly into Photoshop for compositing, or exchange texture maps for easy changes and amendments. I’ll also discuss how to bring a whole 3D scene into Photoshop and add a few troubleshooting tips.
But I know that videos aren’t for everybody, so I thought I’d also add some written instructions here for good measure.
Installing the Bridge
The easiest way to get the bridge onto your system is via the DAZ Install Manager (DIM). Make sure the path to your Photoshop installation is correct (you can check this by clicking that little gear icon at the top right, and then select the Applications tab).
With each Photoshop upgrade, Adobe may change the installation path, and if that’s wrong, Install Manager can’t copy the files into the right location – so it’s something to watch out for.
DAZ update the bridge with every major release of DAZ Studio, which means that you can only install the most current version of the bridge with the most current version of DAZ Studio. If you’re running an older version of DAZ Studio, you must upgrade before the bridge can be used (I don’t think we have access to previous versions of either DAZ Studio or the bridge).
Starting the Bridge
Open both DAZ Studio and Photoshop to begin, and load the item you’d like to work with into your DAZ Studio scene. Now head over to File – Initialise Photoshop 3D Bridge. This will create a new camera in your scene and switch you away from the default Perspective View.

Frame up your object and add a light or two if you’d like to render into Photoshop to make your scene look pretty (this isn’t necessary if you’re only using the bridge to exchange texture maps).
Switch into Photoshop and create a new document, then choose File – Automate – DAZ Studio 3D Bridge. If you can’t see this item, and you’re certain that you have the bridge installed, then it’s likely that the path to your Photoshop installation is incorrect.
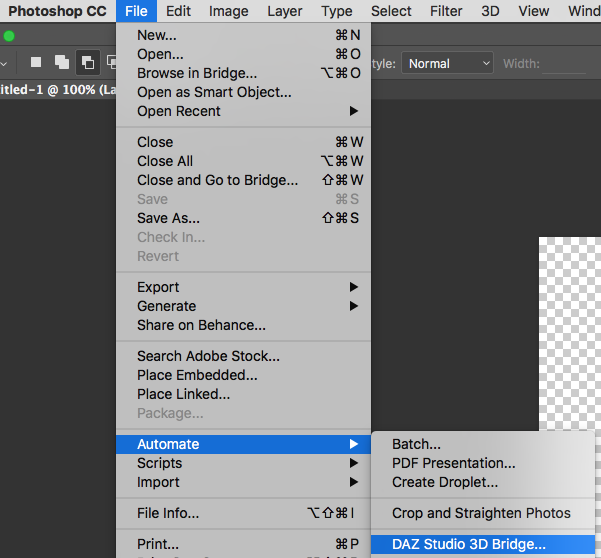
Clicking this option will bring up a small floating palette for use in your workflow. Note that not all options are functional at the time of writing (July 2016).
Rendering directly into Photoshop
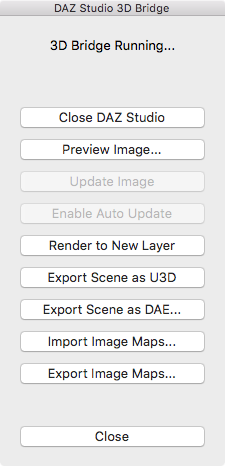
You can use the bridge to render your current DAZ Studio scene onto a new layer into the current Photoshop document. To do this, select Preview Image first, which will ask for dimensions of your render and create a new locked layer. It will also make the two options Update Image and Enable Auto Update in the floating palette active.
Neither of these options work, and the new layer isn’t necessary – delete as you see fit… let’s not worry about that though.
Select Render to New Layer, and the bridge will call upon DAZ Studio to render the current scene. Depending on its complexity this can take a while, during which time the floating palette will be greyed out. When DAZ Studio has finished rendering, Photoshop will create a new layer and place the rendered image on it, complete with transparency.
You can now add other 2D elements to your scene, from backgrounds to composite elements and anything in between, or tweak the camera position in DAZ Studio and render to another layer. This is great to test various angles of your scene on top of a 2D background without having to save a temporary image and import it into Photoshop.
Exchanging Texture Maps
You can exchange texture maps between an object in DAZ Studio and Photoshop. To do this, select Import Image Maps in the floating palette. This will bring up another palette with a list of all image maps in your current scene, including diffuse, bump, transparency and even HDRI light maps.
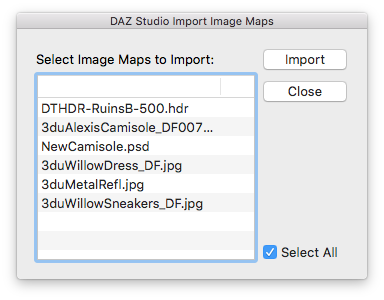
Depending on how many items you have in your scene, this list could be rather long. If you only want to texture a single item, it’s best to delete other elements from the scene to keep the confusion to a minimum. Note that the bridge has a “select all” option that is enabled by default. Feel free to un-tick it and only import the maps you want.
Photoshop will open each map in a new document, allowing you to make changes and amendments to each map separately. When you’re done, select Export Image Maps from the floating palette and – in theory – all your changes will be flattened, saved to a new file and applied to your objects in DAZ Studio.
I say “in theory” because it only works the first time you try it; make another change, and nothing appears to be exported. Perhaps it’s a bug, or perhaps it’s “a feature”.
Either way, it’s no good if you want to see your changes live, so I’ll tell you an easy workaround for this: save your texture map as a PSD file, then apply said file in DAZ Studio on the Surfaces Tab. The advantage is that every time you make a change in Photoshop, simply save over the file (via CTRL+S / CMD+S) and your changes will automatically be put live on your object.
Should this not happen as expected, check that the Automatically Refresh Images option is selected, on the Surfaces Tab context menu.

Importing the whole 3D scene into Photoshop
You can also import your whole DAZ Studio scene into Photoshop as a fully fledged 3D object. I didn’t really understand this concept at first, until I tried it out and thought “what a clever idea”. In essence, it’s like opening a 3D object directly in Photoshop, without having to save it in another format. Note that this only works in Photoshop CC and versions of Photoshop Extended (the non-Extended versions lack the 3D capabilities).
To do this, use the option Export Scene as U3D. When you do, switch back to DAZ Studio and hit accept on the window that pops up (feel free to amend the default values here). Meanwhile, back in Photoshop, your scene has been imported into a 3D layer – waiting to be manipulated and combined with all kinds of 2D elements. All rendered in Photoshop.

The bridge also offers the option to Export Scene as DAE. The principle is the same, and you don’t have to switch back to DAZ Studio to accept any values, but the object is imported with the wrong axis and sometimes without textures. The difference is that this option exchanges data using the Collada format (which has let me down on many other occasions, no matter how good its intentions are), while the U3D option exchanges data using the Universal 3D format.
If you didn’t know about the funky 3D features in Photoshop, or have never had reason to try them out, check out my introductory video on this subject. Perhaps it’s something you can use on your next project.
![]()
Podcast: Download (Duration: 21:56 — 20.1MB)
Thank you, I was able to install 3D Bridge for Photoshop. 😀