While I was deep engrossed looking for a feature in the Blender Settings, I found something else I didn’t know about. It’s a way to always orbit around a selected object, rather than do that awkward thing where the viewport just goes off into oblivion when you least expected it.
I frequently use the NUMPAD + . (full stop) trick to focus on the selected object. This zooms in on the object, centres it on the screen, and as a result I can conveniently orbit around it. However, if an object is framed off centre, or even off screen Blender does something else when you move the camera… and I must admit that I’ve not been able to figure out what it is exactly. I probably never will. B
ut that’s OK, because there’s a simple tick box under Edit – Preferences – Interface that’ll make Blender orbit around whatever is selected, no matter where it is in relation to the screen. It’s called Orbit Around Selection.
When enabled, it behaves more like I would intuitively expect. Another Blender Mystery solved, and it makes me appreciate this amazing work of art even more.
This is not true anymore in version 3.3.
You don’t have that option under “Edit – Preferences – Interface”.
They keep changing everything around and never follow the “standard” convention rules. Maybe that’s the huge problem that keeps many professional people (that use professional CGI software) away from Blender.
They are unable to make Blender user friendly.
Even the hardcore Blender users, they don’t know any better, so they have no idea what they are losing by not working using the natural and expected “standard” convention tool flows and there is no way to convince them otherwise. Believe me, I’ve tried.
Perhaps it’s enabled by default nowadays? It still works as expected for me, even on new installations with the default settings. I totally agree with you, the pace at which Blender keeps changing makes documentation outdated seconds after it’s published.
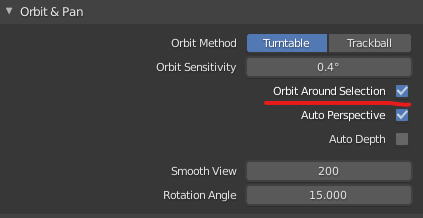
Seems they just moved it to(v 3.3.0) ..
Edit-> Navigation->Orbit&Pan
Awesome, thanks for letting us know! I’ve been all over the Preferences and couldn’t find it in 3.2 😃
Nice tip. For those looking in 3.3.1, it is now in Preferences->Navigation.