Many animation apps have an exciting feature that lets us re-use a group of keyframes in a more convenient way to build larger and more complex animations. They’re commonly referred to as non-linear editing. A popular example includes setting up an action as keyframes once, and then looping it using an NLA bock of sorts (like a walk cycle). Better yet, animations can be combined and transitioned without interruptions or ugly pops. We can even overlay several actions, such as a walk cycle, an eye blink and a waving hand gesture.
Blender has these features, and while difficult to grasp at first, they’re surprisingly simple to use once you grasp the concept:
- setup an animation using regular keyframes, or import it from a service like Mixamo
- turn this group into an Action Strip (that’s what Blender calls an NLA block)
- add this Action Strip onto an NLA track, repeat it or combine it with other strips
- add transitions in between blocks to seamless motion
- add tracks to combine animations
Here’s how it works for me. This might not be 100% accurate, but it’s good enough to build seriously cool animations with ease. I’m using Blender 2.82 for this example, and I’m expanding on principles I’ve briefly touched on in my previous article about looping walk animations.
Turning Keyframes into NLA Blocks
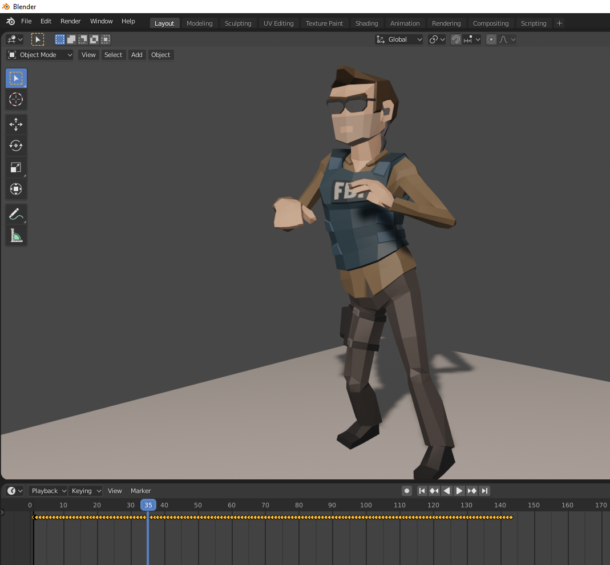
When you have an animation setup, it might look a bit like this. I’ve taken a Mixamo Animation and added it to my FBI Agent character. At the bottom you’ll see the keyframes that move my man around. This is in the regular Layout workspace (the tab at the top). Note that my character is selected. Timelines are context sensitive and display keyframes only for the selected object.
To turn this whole sequence into an Action Strip (or NLA BLock), I like using the Animation Workspace. It’s setup with a different type of timeline called the Dope Sheet. It has different features than the regular timeline, but it still deals with keyframes. Among many other things however, it allows us to create an Action Strip for use in yet another timeline called the NLA Timeline.
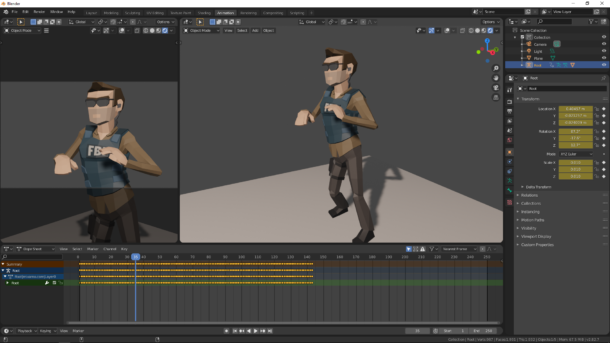
This is what my workspace looks like in Animation mode. On the left we see the active camera, on the right a regular viewport, and at the bottom is the Dope Sheet, with which we could examine keyframes for individual parameters such as location and rotation for each axis, rather than just a single keyframe that we see in the regular timeline.
Take a look at the bottom left and see the menu that says Dope Sheet. Let’s switch this to Action Strip (red box in the screenshot).
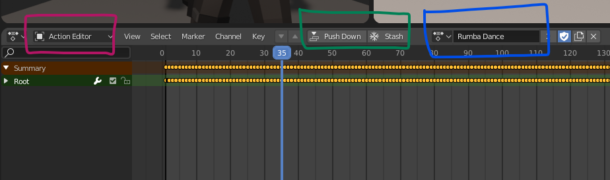
We now have two options (green box in the screenshot): Push Down and Stash. They’re both useful, depending on your needs:
- Push Down will turn the animation into an Action Strip and add it to a new NLA Track (more on that later)
- Stash will turn the animation into an Action Strip for later use
Don’t worry about the exact ins and outs right now, it’ll make more sense when we work with the NLA Editor in a moment. For now, just know that both options exist. Before we hastily press any of those buttons though, let’s take a look at the blue box in my screenshot though. That’s the name of our Action Strip. By default an object might not even have an Action Strip yet, in which case that button reads “new” to let us make one. The default is called Action, but it’s easy to rename it into something more memorable. Mixamo animations are often called something rather long, so it’s best to rename them now. I’ve called mine Rumba Dance. This name will be retained when we hit either Stash or Push Down. In fact, let’s press Push Down now and see what happens.
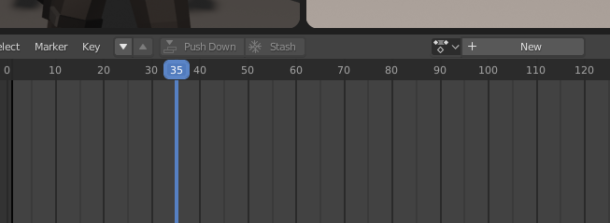
Fascinating: all keyframes have gone, and it appears there’s nothing there anymore – despite our character still being selected. Don’t worry: we’ll retrieve them in the next step.
The Fabled NLA Editor
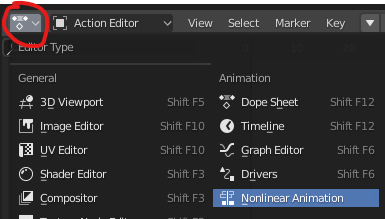
Let’s stay in the animation workspace and change the current Dope Sheet timeline into the NLA Timeline now. To do that, select the small icon on the far left and pick Nonlinear Animation.
This will change the bottom part of the interface to look something like this:
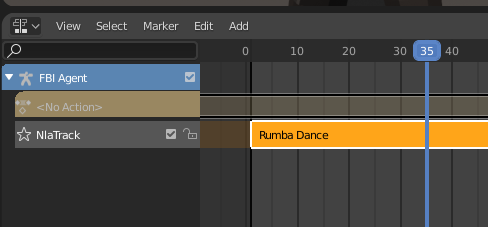
Notice the three strips on the left, the bottom of which is called NlaTrack and it contains an Action Strip called Rumba Dance. That’s our keyframes from earlier! The NLA Track has been created as part of our “push down” action. Had we used “stash” instead, the interface would now look like this:

Very similar, but without a track to play back our Action Strip(s). The Action Stash works a bit like a storage space. Whatever is in there can be selected in the Dope Sheet so we can push it down when we need it. This comes in handy when you’re bringing in various animation blocks before adding them all to a track to build your final animation.
Transitioning Action Strips
I brought in another animation from Mixamo and “pushed it down” in the Dope Sheet, in addition to the one we setup earlier. I’d like to transition my first one (Rumba Dancing) seamlessly into a Cheering gesture. When I switch back to my NLA Editor I see something like this, showing both tracks on top of one another.
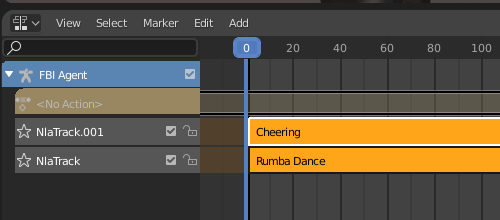
This has happened as a result of pushing both actions down, so Blender created a second NLA track for me. That’s not what I want here, unless I’d like my FBI Agent to dance and cheer at the same time. This would be useful if I wanted to add an eye blink to a walk animation though. Perhaps next time.
I’ll grab the Cheering block and slide it down onto the first track, with a little gap in between this and the previous block. This gap is important, so Blender can have some room to interpolate both actions in a moment.
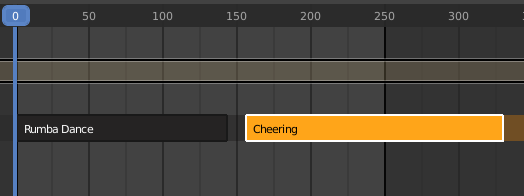
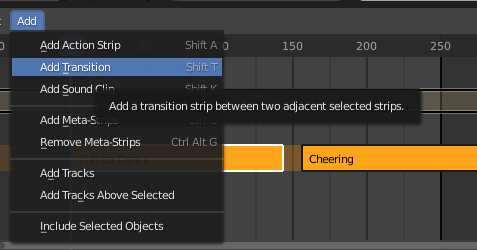
To add the transition, I’ll select both Action Strips and hit SHIFT + T (or select Add – Transition from the menu). This will create a little blue spot in between the strips. Feel free to move the second strip further left or right, and the transition will automatically adjust.
When I play my animation back now, the Rumba Dancing turns into Cheering at the end without awkward pops. As I said, this thing is powerful and filled with features. Give it a try! I’m still learning more about this feature myself, so watch our for more articles. I’ve talked more about looping Action Strips in this article.
Hi,
i liked this article, very helpful.
I am currently in the progress of making a cinematic in blender using only Mixamo characters and animations and needed this information.
I do have one problem with the transition strip. In your example you make use of two static animations (so where the character itself doesnt move, like walking or running). I am using a walk animation where the character stops and then has to go over into a idle animation. Now the problem at first was that the idle animation would start at the origin of the character so it would snap back to the location where the firs animation began. I fixed this using a offset with a root bone.
Now to get the transition between the two animations to be smooth, i added in my setup in the NLA a transition strip between the two strips. But then it does something unexpected where my characters location springs forward and then gradually moves back to the position i created with my offset at the end of the walking animation and the beginning of the idle animation.
I hope i explained this well and i hope you can help me with this, have been struggling with it for a couple of days.
Greetings
Rob
Hi Rob, I find it easier to add the forward motion not to the NLA strip, but to a regular keyframe animation. That way the animation itself can exist without tweaks and can be reused easier. To make this happen, i add my character to an Empty, inside which it animates, then the Empty has its own handle that can be moved forward. For your example, I would remove the offset to avoid the jump between animations. Make sure they blend well first, then add forward movement using the empty.
How do you get the NLA strip back to standard Keyframe so it can be edited?
You can use the Dope Sheet in Action Editor mode to adjust those keyframes. Select an Action Strip from the drop down, then expand the hierarchy on the left to see the keyframes.