Like everything in Unreal Engine, rendering a subject with a transparent background isn’t a one-click affair. It’s doable though, thanks to a neat tip by Alexzander The Geek on YouTube. In the above screenshot, the background was added in Photoshop, exactly how I like it! Here’s how to do it in principle:
- enable transparency in your Project Settings
- set all elements you don’t want in your render to “hidden in game”
- render as PNG or EXR
Let’s take a look at this step-by-step with screenshots.
Enabling Transparency in your Project
Head over to Edit – Project Settings and search for Alpha. Change the setting under Engine – Rendering- Postprocessing from its default “Disabled” to “Allow through Tonemapper”.
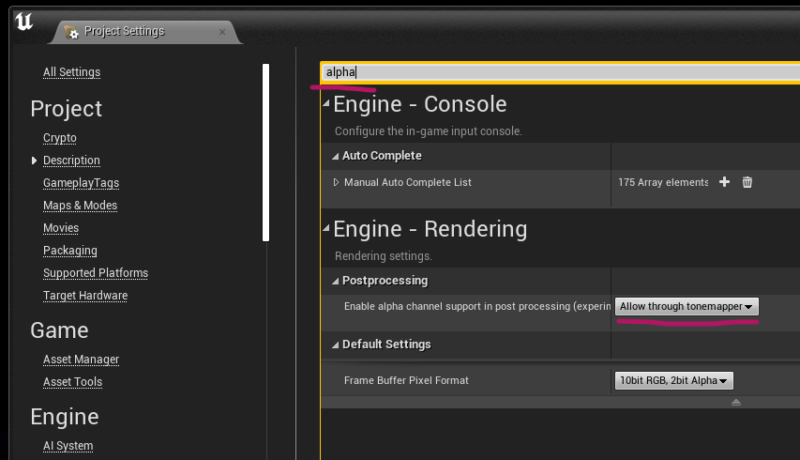
Note that this will require an engine restart and a re-compilation of all shaders in your project. A restart is usually quick, but adding transparency takes quite a bit longer. Time to grab a coffee.
Hiding unwanted Actors
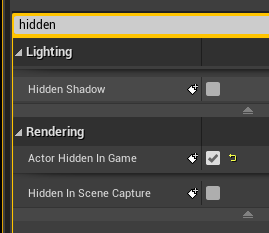
Select the objects you’d like to hide in your project, anything that would normally be drawn out in the background (sky, walls, etc). Don’t hide your lights, otherwise they won’t contribute to your overall lighting composition. Search for “hidden” in the details panel and enable Actor Hidden In Game for everything you want to remove.
Rendering with Transparency
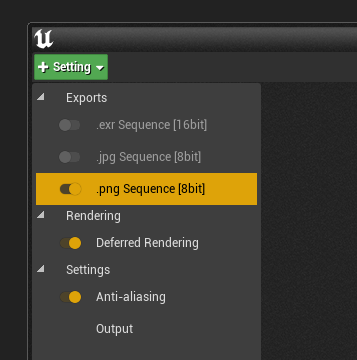
By default Unreal Engine will render a JPG image sequence, but that doesn’t support transparency. Change it to either PNG or EXR in the Movie Render Queue (the legacy Movie Capture doesn’t seem to render transparency). I’ve had issues during testing, which seems to have been alleviated by saving all files before starting a new render. Could be a bug with Movie Render Queue, I remember the legacy option prompting us to save before a render could even begin.
Major Caveat Alert: Rendering with transparency only works with a single sample. If you override Anti Aliasing with a higher sample count (spatial or temporal), transparency is not rendered as of Unreal Engine 4.27.2. Let’s hope this is implemented in a future update.
As a workaround, render an image with a single sample to get transparency and use it as a mask, then render again with a higher sample count, or oversample the image size to get a similar effect with built-in transparency.
UE 5 Update
As of Unreal Engine 5 there is a setting called Accumulate Includes Alpha, which adds 30% to your render time. Enabling this will let you render with multiple anti aliasing samples and transparency.
for some reason the transparent render simply renders a fully transparent png do you have any idea why? the jpeg renders just fine other than the backround being black
I’ve not had a chance to check out how Unreal Engine 5 handles transparency. Knowing EPIC, it’s possibly changed considerably since UE4 as described in this article. If I find out, I’ll certainly update the instructions.
I’m having the exact same issue!
i think i might have a solution for you.. I ran into a similar situation a few weeks ago.. I Changed my default Anti-Alias settings to FXAA.. I changed it back to the Default settings and my EXR and PNG was able to render out as usual.. Hope this helps..
Thank you Jin, I’ll try that!
Hi ! My render have noise instead of alpha… Didyou know where could be the problem ?
The project has the good settings, i’m render in MRQ but every trials have noise instead of transparency….
Sadly no, they’ve changed transparency around a little bit and I haven’t kept up with it – sorry.