I’ve heard so much about the Unity Game Engine, I’ve seen what people can build with it. Some of my favourite games use it, and it has long been on my list of things to “check out” if ever I have a few spare hours.
Turns out that time has come this Friday afternoon, and I thought I’d best take some notes on how it all went. In case you’re in the same boat, i.e. a total N00B at Unity, perhaps I can save you some time. I’ve previously installed and very briefly tested the Unreal Engine, and I’m usually good at figuring out how to make something work on a computer, so let’s see how it’s going with Unity.
For posterity, I’m using Unity 2019.2 in September 2019 here.
Let me tell you, it wasn’t easy. It wasn’t smooth. I’m not sure how much time I’d like to invest, no matter how awesome it might be after that long dark tunnel of awkwardness. In the end I did make a small project (linked below) and got the hang of the basics, but getting there wasn’t pleasant. Here’s how it all went for me.
Installing Unity
The first hurdle was of course getting Unity to run on my system. Good interfaces give you an obvious link that sets everything up for you. On Windows you may have to click OK about 40 times for literally no reason, but that’s Windows. However, a good first impression is often important for me to bond with a product.
Unity gave me two big green buttons, yet it still wasn’t clear to me what to do.

Turns out I had to click the BOTTOM button first, to install something called Unity Hub. It’s like a launcher type thing that’ll take care of updates and additional components. The two buttons make it look like the hub is optional, but if it is, it might just make my life harder down the road.
So… click button #2 first, to install the Unity Hub thing. Then, come back to the very same screen above and click button #1, which will now tell the (open) Unity Hub thing to start downloading. I picked the basic components and let it run for half an hour. The total download size was about 1.4GB.
Getting a License
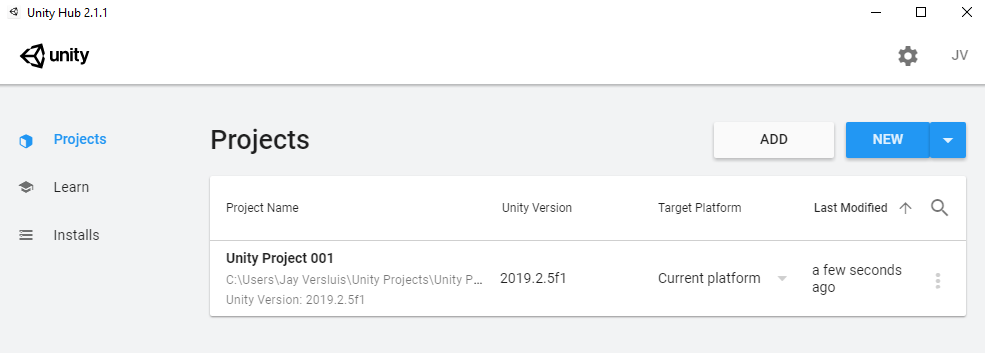
Once Unity was downloaded and ready to be launched, it looked like I could create a new project and get going. So I clicked the big blue NEW button to get started. I could even pick a starter template.
Sadly though, that didn’t seem to get met anywhere, because Unity didn’t want to start. Apparently I didn’t have a license yet. Hm…
I understand that Unity wasn’t always free to use for hobbyists. Now that it is, every user still needs a license to get started. A fantastic interface would sort that out automatically. An “ok” interface would have presented a simple link to make that happen.
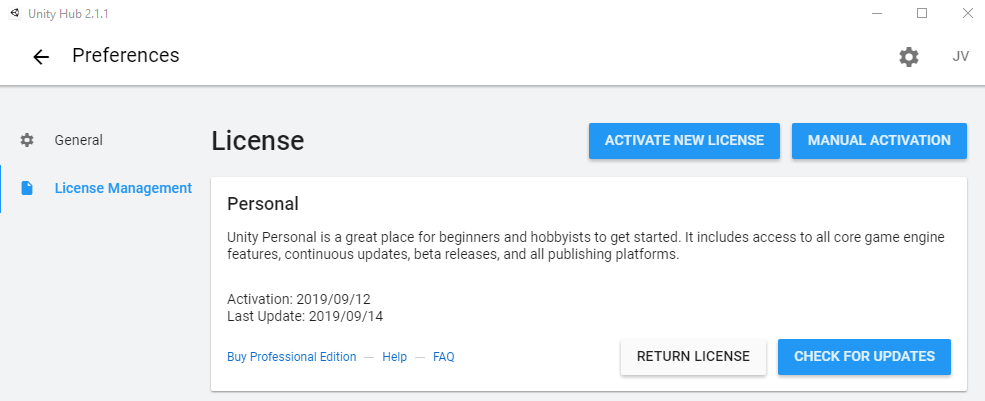
Unity does neither. I had to search Google to find this article that explains what buttons I need to click to get a free personal license. Here’s how to do it:
- in Unity Hub, find the litte cog icon at the top right
- navigate to License Management
- click the option Activate New License at the top
Now I was able to start a new project and take my first look at Unity. We get a choice of five templates, the bottom two of which are probably designed for visitors from another dimension.
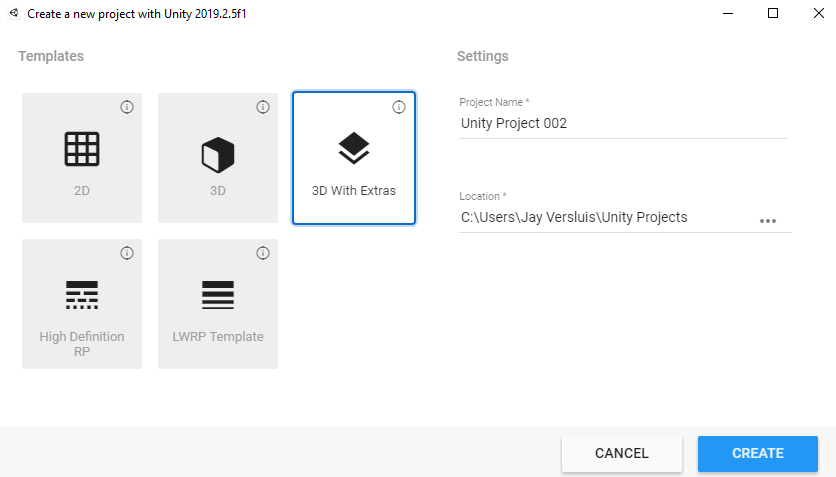
This will get us to another screen, from where we can also launch objects that we have previously created. That’s a nice touch. I picked 3D as my very first project, but after looking at a completely empty interface, I started a second one based on the 3D With Extras template.
The Interface
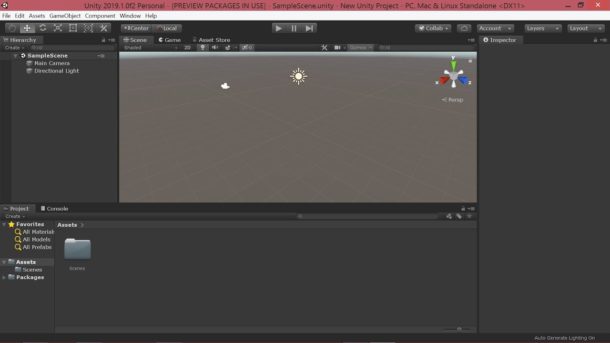
There it was. The default Unity Interface. Looking at me. Staring blankly at me, waiting for me to do something creative with it. It’s the same interface those developers from Firewatch and Subnautica are dealing with every day. They’ve successfully used it to build beautiful worlds.
I’m not getting a good vibe. Instead I feel reminded of the Blender 2.4 interface. Light grey. Unintuitive. Functional probably, most likely designed by coders and certainly not by or for creatives. This much is clear: it will be a real struggle for me to have good time here, no matter how far I’ll delve into the world of Unity.
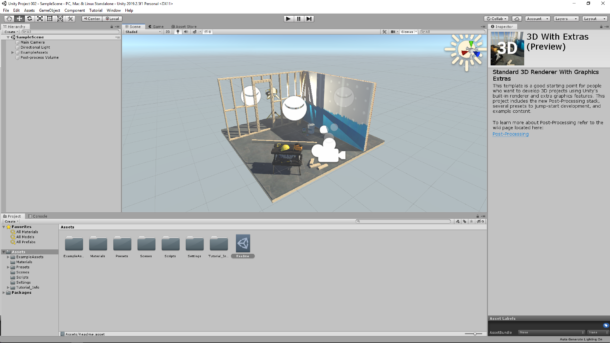
Undeterred, I’m wandering into the unknown. I see a scene, that’s a nice start. A small workbench set and a half-painted wall. I didn’t get that in the empty 3D project I created before this one. I also see three tabs at the top above the main screen, to display the Scene, Game and Asset Store. Just next to it I can pick various shading options. Perhaps I can figure this thing out after all.
There’s also something called The Inspector on the right, with a brief explanation of the current scene. It’s not clear how I can change it to tell me other important things. Maybe he’s context sensitive. I’ll watch this panel closely going forward. And indeed, it changes as I press on things randomly and work my way through some of the icons.
The Dark Interface
I remember when dark interfaces took the world of creative apps by storm. It was about 10 years ago when this happened. Unity too has the option to switch the Editor Skin from Personal (light grey) to the Dark Interface. We can find this option under Edit – Preferences – General. There’s a drop down called Editor Skin.
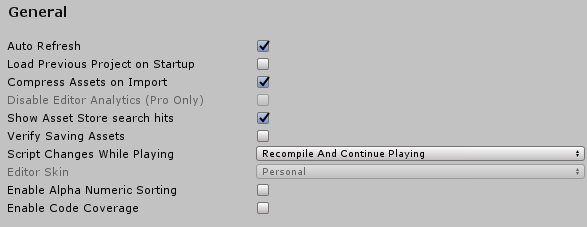
Sadly though, it’s greyed out in my version of Unity. What’s going on there? I’ve seen screenshots of Unity in beautiful non-distracting and less headache inducing Dark Grey.
You won’t believe it, but they’re actually charging for this option to open up. It’s true! Unity have three price plans:
- Personal (free)
- Plus ($35 a month, or $300 per year)
- Pro ($125 per month)
Among several other (real) features, either of the paid-for plans unlocks the Dark Interface. They’re explaining it in this support article, adding a comment that “this is a very frequent complaint”. It’s hilarious! If I was a Sim, I’d now have two red minus signs in a speech bubble above my head, and my perception of Unity would be altered negatively.
To show the above dark skin screenshot, I did find this video by a French hacker who shows you how to use a HEX editor to tweak things for enabling the dark look for Personal Unity Editions. It looked a tad involved and I didn’t pursue this – just thought I’d share it all the same.
I continue to press buttons and watch a tutorial or two on the Unity site to get my bearings. At least I figured out how to tweak the layout of the palettes (aka The Workspace) from this article, and I’m pleased to say that I was able to save my own. 2×3 works well, with the second and third column merged into one.
Navigation
No 3D application ever uses the same rotational and translational controls as the next one. It’s like there’s some kind of unwritten code between all of them that says, “every app must be different, users must never feel at home”. At least so it seems. Here’s what I’ve been able to figure out:
To navigate the 3D Scene (the one at the top, not the Game View at the bottom), we need to click and drag with the RIGHT mouse button. It’s just like the old days of Blender. The scene moves in “look” mode by default, so you don’t rotate around the selected object. Other programmes call it “trackball mode”. It feels weird, and I don’t know how to disable it. You can focus in on a selected object by pressing the F Button while hovering over the Scene Window.
You can zoom/dolly in and out by scrolling the mouse wheel, and to pan left/right/up/down we need to hold down the middle mouse button. To explore the scene as the player would, click the play button at the top of the interface. This will activate the cursor keys for navigation by default. I appeared to be moving extremely fast, as if I were flying a fighter jet – too fast to navigate a 10x10ft scene. But hey, it’s just a demo. And it’s free.
It appears that out of the box, the experience needs a lot of tweaking to be usable. I’m keeping my first 24 hours with Unreal in mind, in which I could start a template and had a perfectly working demo at my finger tips that required no tweaks to be enjoyable. It’s really not like that with Unity.
I also managed to use the Asset Browser to drag new material presets onto existing objects, and even drag objects into the scene. Sadly they are shown as a giant white football, unless they’re deselected. I guess it has to do with the bounding box, or a collision cage showing, and I did eventually find out how to switch it off but can’t remember how to do it now. Not intuitive I’m afraid, that’s all I remember.
There were also a variety of greyed out and scary sounding menus to look at, all of which seem to tell me the same message: “You don’t belong here”. I persevered nevertheless.
And then there’s Code
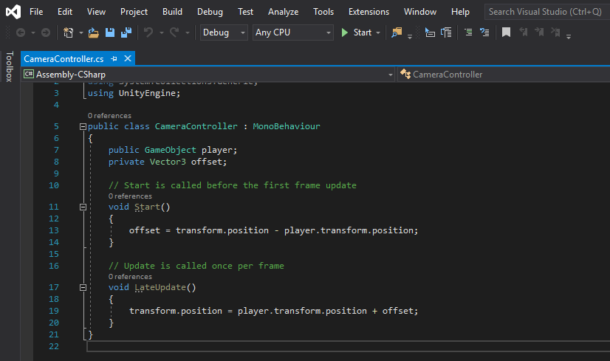
I’ve heard that scripting for Unity is happening in C#, using the Mono Framework. The good news is that when I installed Unity, Microsoft’s Visual Studio installed alongside with it. Double-clicking a script file inside Unity results in Visual Studio to open, for which a Microsoft ID and a few minutes of time for the “first configuration run” are required. I looked at the code and even understood some of it! All those years dabbling in iOS development apparently has paid off. C# looks surprisingly similar to Objective-C.
Events and behaviours are done in code, things like “do this when you collide with an object” or “do that when the player moves”. It’s like proper dirty hacking in text files. Binding 3D objects to code is well done via drag and drop to the relevant code properties via the Inspector. It feels like Unity is an extension of an IDE. I like it!
To edit code efficiently, an external editor is required. That’s both clever and platform agnostic. A code editor typically helps with code completion, code highlighting and all kinds of other things. Some basic integrations are included between the two apps, so whenever you want to edit a script file, Visual Studio opens. This is what it looks like (note the swishy dark interface):
Here’s the problem: Microsoft has about 157 different versions of this tool available, all branded as some type of “Visual Studio”. One version is a complete IDE that can compile code and run it (for standalone applications), another is a simple and lightweight editor called Visual Studio Code.
It’s the latter that we should be using (think light, fast, extensible), however it’s the former that’s installed by default (think bulky, big, slow, heavy, overkill). Not to worry. At least we get some kind of funky modern code editor. It wouldn’t really be a problem at all, if the installed version did a good job, which for displaying and editing code it definitely does.
The problem lies in the fact that every programmer needs a bit of help to write code these days. We don’t usually want to write out long method signatures and properties by hand and smuggle in typos that lead to compiler errors. Instead, we’re used to hitting a button and get code completion, code hints, function suggestions and all that. The friendly Unity Community has written all these tools, but they’re not available for Visual Studio. It seems they’re only available for Visual Studio Code, which is sadly NOT the editor that’s installed with Unity.
We N00BZ don’t know this of course, unless we do endless research and fiddling. I for one did’t even know there were so many confusing versions of Visual Studio available. I’m not complaining, just saying that this whole install procedure could be a lot less confusion and less complicated that it is.
I have a lot to learn about how Visual Studio (and/or Code) will recognise Unity methods, and how it may automatically bring up the documentation as I’ve seen in some videos. It’s those basics that *should* work out of the box, but they don’t. I get a feeling of clunkiness around here, the same feeling you get when you run Eclipse on Linux. You just… don’t want to feel that way.
My First Game in Unity
One good thing I must admit is that there’s a huge section of official videos to get new users started, much like the excellent and detailed documentation. These are the two links to bear in mind:
I started watching the Roll-A-Ball Tutorial and completed it this morning, and was surprised at how possible it was to make something happen, complete with game controller support. No masterpiece of course, but the course explained how Unity ticks – both in its interface and in its code. I also liked the way the course is not just a YouTube playlist, but actually has written code and chapter points that get saved on the website under your account, so you know where you’ve left off.
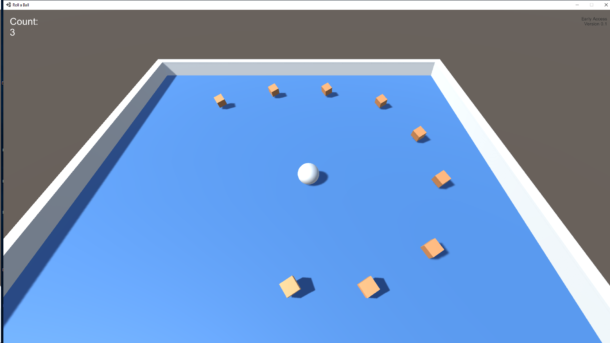
The above course covered everything from creating objects, manipulating them, adding basic materials, writing code to make these things work together, and it touches on how to build the project as a standalone distributable application. If you like the look of the above, here’s a free download (Windows only at the moment, but other platforms are supported):
Aside from free tutorials, there’s also a Learn Premium section that’s either $15 a month (or $99 per year) and gives you access to bi-weekly live sessions with certified trainers, in addition to more tutorials. There’s is a 30 day trial option too. Also, Learn Premium is included with the Unity Plus and Pro subscriptions.
My Verdict
It’s difficult to get started with complex tools like this. I’ve seen the amazing worlds developers can build with Unity, and it shows their talent and perseverance in using this engine to build their projects. It’s probably best to describe Unity as a blank canvas, and with the right help, it is definitely possible to get started.
However, it’s not an easy journey to get anything out of this thing, nor is it fun or entertaining. To reach that point, sweat, tears and frustration will visit frequently. It would be easier if the makers of Unity would make the whole installation process way simpler than it currently is (as of September 2019), less confusing and literally more human. I get the feeling Unity is made by coders for coders, and certainly not by or for creatives. Which is bizarre, because that’s technically the target audience. Those types of users, me included, we need pretty interfaces, we need excitement along the way, we must never get bored – otherwise our mind just wanders to other places, and perhaps different tools than the one we’re currently trying to learn.
All I have to compare against Unity is the Unreal Engine. I’ve not written about my experiences yet, but all I had to do there was press one button and wait for the installation to be over. Then, I selected one of many templates, clicked a button and I got to see a real playable scene. For new users, that’s exciting, inviting and gives the impression of welcome. Unity is very different. It doesn’t say hello, it doesn’t want to welcome you. It’s like an alien with which you have to figure out a way to communicate.
Whether it’s worth investing time and effort into learning Unity is a tricky question. Thinking of how wide-spread the engine is, I’d say maybe – at least for those in pursuit of a career in game development. Creative users looking for a real time rendering engine should perhaps look elsewhere.
I can see the potential for projects built with Unity, and it’s track record speaks for itself, but since this is my first foray into exploring a game engine, I have nothing to compare it to. Maybe they’re all really difficult and not user friendly at first sight. Perhaps I’ll try to build something with Unreal and get back to you.
For now, I’d have to say Unity is difficult, even for 3D veterans. It’s not a “pick up and go” affair. There’s very little familiarity in there. Coders might feel at home more than creative users. I strongly suggest getting help rather than starting out on your own, explore some of the Getting Started guide on Unity.com. When you do, take a full uninterrupted day out for this adventure. It’s not something you’ll grasp in an hour.
Hi Jay,
thanks for this article. This was really very helpful for me.
Until I can deal with game engines some time will pass – at the moment there are too many other projects to do. But next winter that will change, and I have often asked myself: Unreal, Unity, Cryengine or Godot?
I have no intention of really making a game, It’s more about the fun of creating worlds, and maybe I’ll turn to creating paid assets, so I need to know how the game engine works. I know it’s not going to be without programming, but for the most part it should be about the creative side.
I’ve already thrown Cryengine out because there’s too much done with coding. After your article, Unity will take the same way. I won’t look at Unity at all. Your article saved me a lot of time and nerves – thank you very much!
So there is still unreal Engine (I have some insight into this through an online course and that seems to fit me) and Godot.
It would be great if you report about your experiences with Unreal Engine.
Best, Chrissy
I’m so glad it helped! I’m looking forward to putting Unreal through its paces and see how I click with it. For starters, the whole installation and “getting started” procedure is a breeze compared to Unity. What I also appreciate is that Unreal asks, “are you a game developer or a 3D designer” when you download. Although it’s the same engine, they’ve got an eye on people who want to utilise it for things other than making games. So perhaps it’ll be easier for us 3D Vets to understand and use.
I don’t think I’ll explore the Cryengine either. I’ve seen what it can do, it’s fantastic – but then, so are they all. Unreal and Unity have the biggest marketshares tight now, and they have marketplaces to sell assets at, which makes them good contenders.