When exporting files from Blender for use in Unreal Engine via OBJ, we have to apply some settings for objects to behave correctly. These can be made either on export from Blender, or on Import to UE. Of course I forget how it works when I need it next, and despite the handsome presets I’ve made, I thought a few notes on this ever so time consuming topic would be in order.
Note that exporting via FBX will avoid many of these issues, but depending on your objects, it may not always be feasible to use anything but OBJ.
I’m using Blender 4.1 and Unreal Engine 5.6 for this article.
Exporting from Blender
The default OBJ export options are set to
- Forward Axis: -Z
- Up Axis: Y
- Scale: 1
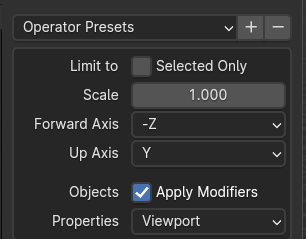
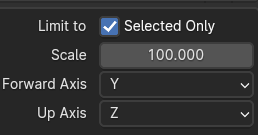
This will lead to objects being 100th of their size when imported into UE, and turned onto their sides. If we apply the following on export, the import will look good (provided we use default import settings):
- Forward Axis: Y
- Up Axis: Z
- Scale: 100
Oftentimes I need to export individual meshes though and frequently forget to apply these, despite the handy Operator Preset options in Blender. These allow us to save these settings so that we don’t have to remember, but alas it’s no help if they don’t get applied on every export. Hence, there’s also a way to get objects into UE looking handsome when we leave these alone and instead apply this tweak on import into UE.
Importing into Unreal Engine
Assuming we did NOT tweak any OBJ export settings in Blender, we can use the following settings on import into UE to make objects look good:
- Offset Rotation: 90 / 0 / 0
- Offset Uniform Scale: 100

If we need the object to match another’s rotation when we drag it in from the content browser, adjust the Z rotation accordingly.
That’s it!