I’ve spent some time this week putting Blender’s new Cycles X engine through its paces. The team have written about their plans, I’m excited about it and I appreciate the efforts it takes to make this work. I’m already very happy with the current implementation of Cycles, and with a bit of time on my …
Blender can define regions in the viewport that should be displayed rendered. That’s useful if we want to focus on a small portion of our scene. Rather than have the whole viewport displayed in rendered view, we can draw a border using CTRL + B, thereby defining a Render Region. This region manifests as that …
In this episode I’m giving our objects some colour with simple shaders: I’m making the grass green, give the ground an earthy brown and add a shiny golden touch to our logo. I’m also covering the logo with another replicator, simulating an interesting effect. This is part 4 of a mini series about how to create …
By default all our 3D objects are opaque, meaning light does not pass through them. Like a brick wall. But many objects in reality let some amount of light through, like a piece of paper or a glass of lemonade. This partial transparency is called translucency. In the picture above, light passes through the leaf, …
Setting up a Shadow Catcher in Blender is a bit more tricky than in other applications, but nevertheless straightforward if you know what you’re doing. I certainly did not when I first tried it, but thanks to this short YouTube video by Nonsense Blender Tutorials, I was able to set this up.
Texture files can have a transparency value, and as such we’d like to use it on occasion with 3D objects. The above image is created using flat square leaves, onto which an image of a leaf is projected. Outside the leaf, the area on the PNG file is transparent.
Here’s how to create a Cycles Shader in Blender that will show only the leaf and not the surrounding area of the texture.
Sometimes we need a seamless texture to repeat on an object without the help of Photoshop. That’s possible in Blender’s Node Editor, albeit not exactly intuitive. We need to add both a Texture Coordinate node, as well as a Mapping node to our shader to make this happen. Here’s how to do it: setup your texture …
When we setup a standard material for Blender’s Cycles render engine, it’ll start with just a single diffuse node like this: To add a Normal Map to this setup, we’ll need to add two things: a new Texture Map node (Add – Texture – Image Texture) a new Bump Map node (Add – Vector – Normal …
When we setup a standard material for Blender’s Cycles render engine, it’ll start with just a single diffuse node like this: Feel free to change the diffuse colour or add a texture map to it’s colour input. To add a Bump Map to this setup, we’ll need to add two things: a new Texture Map …
Adding textures in Blender depends on which render engine is used. In this article I’ll discuss how to do this for Cycles. I’ll explain how to do this with Blender Render in this article.
First we need to make sure that Cycles is our render engine. Select it at the top of the app. This will change how materials work, so if you’ve got anything interesting setup with Blender Render, you’ll have to rework it all.
Now select the object you’d like to assign a texture to and find the Materials Tab in the properties palette (it’s the little orange round checkerboard icon). By default the material only has a diffuse colour assigned.
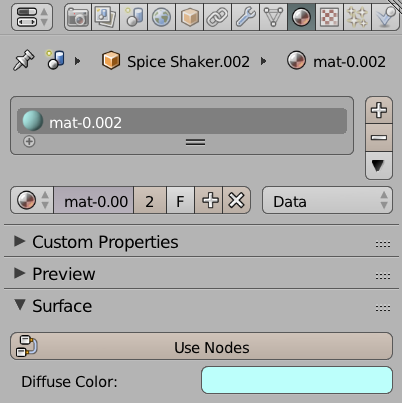
Under Surface, select Use Nodes. This will require us to work with the Node Editor in another viewport. I understand that there’s a different way to setup materials and textures in Cycles, but I find the Node Editor much easier to grasp.