Exporting character animations from DAZ Studio for use in Marvelous Designer is a trifle complicated. In this article I will explain what works for me.
I’m using an animation created in DAZ Studio 4.7 using Michael 6, a Genesis 2 character. I will then create some clothing in Marvelous Designer 4.5, drape and animate it, and eventually export it back to DAZ Studio for rendering.
Here’s how to do it in principle:
- bake aniMate blocks into DAZ Studio timeline
- export OBJ file of your first animation frame
- export the whole animation as MDD cache
- import OBJ into Marvelous Designer
- import MDD cache in Marvelous Designer
- drape and animate cloth
I’ve explained the whole process step by step in this video:
Exporting from DAZ Studio
Although there are several export options at our disposal, the only one that works reliably and without any nasty surprises is an MDD Cache Sequence. This functionality is provided by the aniMate plugin, however the full version is required for the export to work. You can purchase aniMate here:
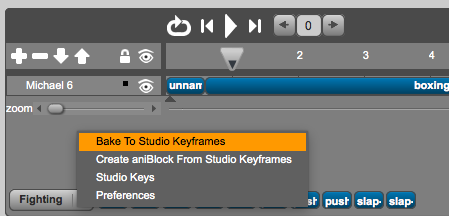
Make sure you have a keyframe animation to export. If you’ve created an animation from aniBlocks (using aniMate), make sure to bake them to the DAZ Studio timeline first. You can do this by right-clicking somewhere inside the empty space in the aniMate timeline and choose “Bake to Studio Keyframes”.
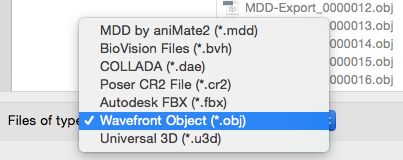
When you’re ready to export your animation, head over to File – Export and select MDD by aniMate2 from the file types menu.

MDD itself does not contain any geometry. It only describes how the vertices of an existing 3D object move from one frame to the next. For another app to make use of the MDD data, we also need an OBJ file that describes the geometry.
Move to the first frame of your animation, then select File – Export again. This time choose WaveFront Object (OBJ) from the list of file types. Make sure it has the same name as the MDD file.
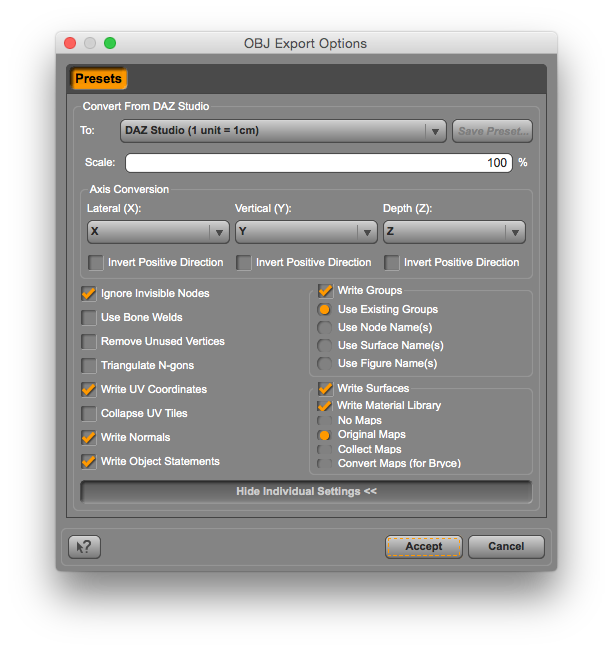
An export dialogue will open. Accept the defaults, choosing the DAZ Studio preset at the top (equivalent to Scale = 100%).
Exporting from DAZ Studio via FBX and Collada
Alternatively you can export the animation as FBX file. The problem with this approach is that none of the smoothing modifiers are exported which are applied to each pose of the Genesis and Genesis 2 characters. It means that the geometry looks slightly different in the FBX file than it does when DAZ Studio displays it.
You can see the effect by moving the timeline to a different position. Just before you lift that finger off the mouse (or trackpad), you’ll see the Genesis figure change slightly. These rather important changes will be part of the MDD sequence, but are sadly not contained in the FBX sequence – at least not according to my observations.
The garment animation will therefore not line up perfectly when we bring it back from Marvelous Designer, leading to nasty poke-through effects. Not pretty!
Collada is another option to export, but I’ve had no luck importing it into Marvelous Designer 4.5. Marcus Wilm had good success with Marvelous Designer 2 – he describes his process in this forum thread.
The most recent version of Marvelous Designer (or DAZ Studio) appears to have bug and leads to an error message upon import. It’s something to try again in the future perhaps. Therefore I cannot comment on the geometry behaviour of the Collada export.
Importing into Marvelous Designer
In Marvelous Designer, head over to File – Import – OBJ to replace the default avatar with your own. Typically this is a T-Pose to make the initial draping and cloth fitting easier. Choose the OBJ file you’ve exported earlier.

Pay close attention to the scale in the following import dialogue. It needs to match the scale with which we’ve exported the OBJ: in our case that was 1 unit = 1cm, as defined by the DAZ Studio preset. Accept all other defaults and make sure none of the axis are inverted.
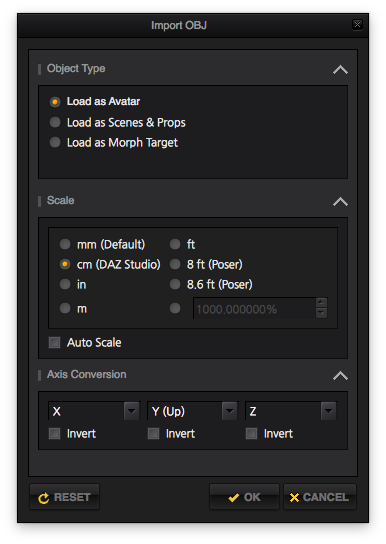
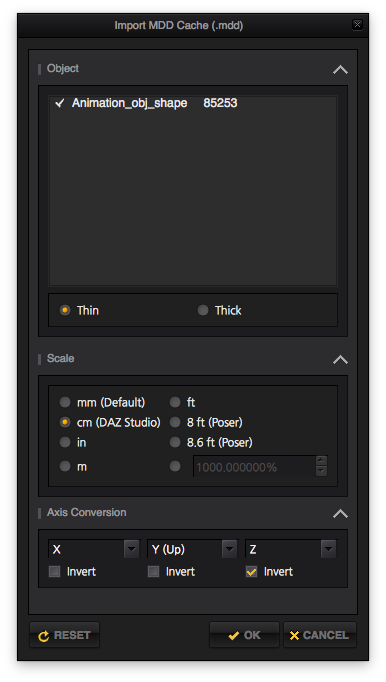
Now load the animation using File – Import MDD Cache (Standard). Another import dialogue appears. Your avatar should be selected by default in the list.
Choose the DAZ Studio scale again and – this is very important – invert the Z axis. Otherwise your avatar will turn around 180 degrees when you start the animation for the first time. This is only necessary when you import the MDD file, not when you import the OBJ file.
Draping your garment
Create your garment and fit it to your liking on the T-Pose, then switch from Simulation into Animation mode (there’s a button at the top right corner for that).
Notice a blue bar in your timeline at the bottom. This is your MDD animation. Hit the play button to see your avatar move, while the garment remains in the initial position.
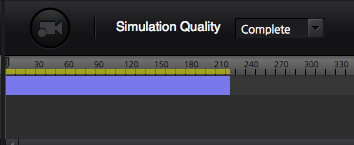
Switch the Simulation Quality from Normal to Complete for more accurate draping results.
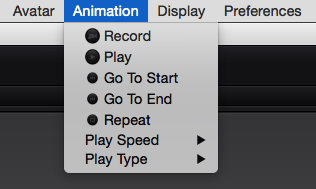
Park the playhead on the first frame of the animation and head over to Animation – Record in the main menu. Marvelous Designer needs to drape the garment for every frame of the animation and will record each pose.
This takes a moment or two, during which you’ll see your avatar and your garment move together. You’ll also see a red bar gradually appear in the timeline, representing your garment animation.
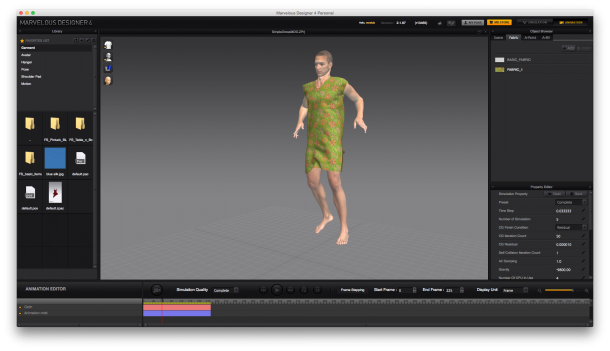
You can now play the animation more fluently, very neat for preview purposes.
In my next article I’ll show you how to export the garment animation from Marvelous Designer and how to import it into DAZ Studio for rendering.
Podcast: Download (Duration: 30:26 — 27.9MB)
Hi There You can find more Daz animations ready to use on http://www.flipbookmarket.com/
Download our free animation here http://www.flipbookmarket.com/TC-Runway-Modeling-00-DazPoser
Thanks for the tip, Jess!
Along the same lines, SKAmotion also offer some great walking aniBlocks: http://www.skamotion.com
Jay, thanks for the amazing tuts you provide. Is there a way I can export a daz figure, like G2M with clothing and animate the garment in MD and bring back to Daz3D. I don’t see any tuts on animating daz clothing in MD. Thanks and congrats.
Thank you, Mojo!
Great question – yes that’s possible, but it depends on the clothing item you’re trying to use. Here’s how it works in theory:
Once done, export your animation as I’ve described it in the article and video. The same principle can be applied to fit an item of conforming clothing to a figure better than DAZ Studio can, or to fit it to a different figure altogether. It works a bit like the Fitting Room in Poser.
The trouble with many conforming clothing items is that they’re not created with such a workflow in mind: often seams are not connected (welded) properly. As soon as you hit the simulation button (the one that shrinks the clothing to the character), you’ll see your clothing literally fall apart to the ground in strips and pieces. If this happens, you may have to do some additional work on the item in a 3D modeller or find different clothing.
Thanks for helping Jay.
All worked fine till I hit that dawn buttom lol. Parts of the clothing and belt fall apart. But you guide worked like a charm. I will try to tweak the clothing in blender and repeat the process. Thanks again, you´re tha man!
Hello Jay, First let me say your video and advice has been invaluable to me and how much I appreciate it as I am working through this process! I have had success but I am wondering if my process could be easier with the Animate2 plugin.
Current process
I exported a Collada file into MD7 and made my clothing. It worked, simulated and animated. Then I exported it as an OBJ sequence, having added Animorph, back into Daz Studio 4.9. It animated and worked with the avatar. The texture did not import so I did a workaround and added it as JPG through the shader utilising part of your process. Here is the thing: If I buy the Animate2 plugin will it enable me to import my texture in one go as an .mtl file ( the option of doing that was unavailable to me upon importing my obj sequence into to Daz 4.9).? Thank you very much, A
Hello A,
so sorry about my late reply – when you left your comment I was in hospital undergoing major, and I remember reading it there – I just forgot to reply by the time I got out. Ah well, better late than never 🙂
Yes I’ve noticed that Collada doesn’t like importing textures into MD. If you’re using MDD as an export option from DAZ Studio (as is provided by the AniMate plugin), the texture imports fine. It will only write a single .mtl file with the OBJ, but that’s enough for MD to use for every image of the animation.
The good news is that you can either buy the plugin from DAZ, and if you don’t like it as for a refund within 30 days. Or, you can use a trial version with a fresh installation of DAZ Studio (the plugin is fully activated for the first 30 days, then it turns into AniMate Light and waits for a serial number). If you already have an installation of DAZ Studio for longer than 30 days (extremely likely), you can still get a “fresh” version alongside it by installing the current Beta Version. It’s usually the same version as the current one, but they’ve been clever enough to make it possible to install two versions on the same system without conflicting with each other.
If you’re interested in trying it, all you have to do is to select the Download Filters on the first tab in Install Manager and select “Public Build” towards the bottom of the list, then hit OK. As soon as you return to the list of downloadable products, you should now see a DAZ Studio Public Build (in yellow). That’s the Beta. Install it and enjoy AniMate benefits for free for thirty days.
All the best,
JAY
Hi Jay, I hope you are doing better now and that you have recovered well. That’s the important part. I think I speak for everyone who has visited this site that we are looking forward to new content from you.
In the end I did buy the plugin. My issue had to do with my prints not coming into Daz automatically and then I had a poke through issue but it seems to be okay now.
I thought perhaphs you may have encountered the issue of when you import from Daz into MD and invert the z axis, the 2d pattern window shows the back of the avatar instead of the front. Would you happen to know of a way one can turn the avatar in the 2D grid to face front?
Best Wishes,
A
Hi Jay, I ended up figuring out what my mistake was. All good. Hoping to see more great tutorials from you really soon! Take care, A