ZBrush Archives

Creating Normal Maps from sculpted details in ZBrush

In this article I’ll show you how to bake out a Normal Map from details that have been sculpted in ZBrush. We’ll use this map to apply the high-res details to an object in Daz Studio for this example, but it will work with any target application. Typically we have a low-ish resolution object that …

Read more

Filed under: Categories 3D Tagged as: Tags

How to use the Transpose Tool in ZBrush 2022

Transpose is an old-skool tool in ZBrush that can be used to pose characters and move parts of objects. It used to be insanely difficult to comprehend (like everything in ZBrush), but when used together with masking, what you can accomplish is quite remarkable. Blender has a similar tool called the Pose Brush, which is …

Read more

Filed under: Categories 3D Tagged as: Tags

How to create Polygroups from Material Zones in ZBrush

This has been puzzling me for a while: how do we tell ZBrush to create Polygroups if we import an OBJ that already has material zones? Turns out the Polygroups menu is not where we need to go to make that change. Instead, head over to Preferences – ImportExport and enable Import Mat as Groups. …

Read more

Filed under: Categories 3D Tagged as: Tags

Creating Brush Shortcuts in ZBrush

ZBrush has an overwhelming amount of brushes available, but many are just variations of things artists have created over time. Typically we don’t need to use more than a handful, and as such it might be useful to switch between them faster than using the default key sequences (like BST or BMV). Many users prefer …

Read more

Filed under: Categories 3D Tagged as: Tags

How to flip normals in ZBrush

I had a weird issue that threw me when I was working in ZBrush the other day: flipped normals (not Henrik and Morten, the actually phenomenon of normals facing the wrong way). ZBrush only shows the “right” side of the normals by default, and although it has the option to show both sides, the default …

Read more

Filed under: Categories 3D Tagged as: Tags

How to combine two Polygroups in ZBrush

It’s a tad difficult to see in the screenshot, but our mission is to combine both legs of my character into the same polygroup. It’s an extremely simple task, but pretty much impossible to figure out in ZBrush if you apply logic. There doesn’t seem to me a menu option either, so by piecing together …

Read more

Filed under: Categories 3D Tagged as: Tags

How to import multiple OBJ files in ZBrush

Ah yes ZBrush. The app that makes difficult things easy, and the basics almost impossible. Here’s one such example of ingenious software design: the simple act of importing OBJ files, let alone multiple ones. There’s no File – Import dialogue like on literally every other 3D app. Instead we use the import option in the …

Read more

Filed under: Categories 3D Tagged as: Tags

Creating ID Maps from Polygroups in ZBrush

I’ve been investigating Substance Painter and how to best select parts of a model. One such option is by using an ID Map, essentially a flood-fill of random colours per material zone. Wendy very kindly brought this to my attention in a recent stream (thanks, Wendy!), and before I forget, here’s how to do it. …

Read more

Filed under: Categories 3D Tagged as: Tags

Projection Painting in ZBrush with Spotlight

I remember making notes on the projection painting tool in ZBrush back in 2013, it’s called Spotlight. It’s very powerful and yet another fun way for us to project textures onto 3D objects. Last night I found the above excellent tutorial by Kevvfx and thought I’d take some notes on how to get started with …

Read more

How to accurately rotate your model in ZBrush

Being the artistic tool ZBrush is, it often felt vague to me when it comes to accurate values. I had no idea how to rotate a model to exactly 45 degrees for example, until I came across this video by Joseph Drust earlier today. Turns out all we need to do is hold down the …

Read more

Filed under: Categories 3D Tagged as: Tags

How to install GoZ in DAZ Studio (step by step)

A viewer asked me recently how to get the ZBrush to DAZ Studio connection going step. I’ve explained how to use GoZ in this article, but I’ve not mentioned the pitfalls of the installation process. I thought I’d put this quick article together with screenshots and all. Prepare Install Manager First of all close DAZ …

Read more

ZBrush Basics Cheat Sheet

I just watched the above excellent one hour tutorial by Henning and Morten from FlippedNormals. It’s a great “getting (back) into ZBrush” tutorial that covers everything I keep forgetting when I give ZBrush a rest for longer than 6 months. Which is essentially every time I use it. While watching I took some notes so …

Read more

Filed under: Categories 3D Tagged as: Tags

Editing DAZ clothing using a reference figure in ZBrush

Even though I own it, I know very little about ZBrush. It may forever remain a mystery for me – like driving a car or getting excited about Team Sports. It’s just… not for me. Be that as it may, I’ve often wondered how clothing manufacturers use a character as a reference to make or update clothing geometry in ZBrush. Perhaps a jacket that doesn’t quite fit, or some boots that need a quick adjustment.

The challenge here is that both the character and the clothing need to be imported into ZBrush, and we need to be able to adjust the clothing only, while seeing the character in the background as a reference so we can work around it.

While the art of sculpting in ZBrush entirely eludes me, I believe I have finally understood the overall workflow. Before I forget it again, I thought I’d share it with you and my future self. Let’s see how we can transfer a clothed Genesis 3 figure from DAZ Studio 4.11 into ZBrush 2019.1, make adjustments on an item, and then bring it all back with a few clicks.

Read more

How to create DAZ Studio Morphs with ZBrush

In this episode I’ll show you how to create morphs for DAZ Studio using ZBrush, thanks to a free plugin called GoZ for DAZ Studio (it’s like a ZBrush Bridge). I’ll also explain the prep-work necessary for GoZ to work properly and how to install it. For Allan. https://www.versluis.com/wp-content/uploads/2019/01/1901-DAZ-to-ZBrush.mp3 Podcast: Download (Duration: 12:48 — 11.7MB)

Where is the Symmetry Option in ZBrush

No matter how hard I try, I just never remember where the Symmetry option is hiding in ZBrush. At least I remember this website, so when I search here next time, this post should come up. Which tells us that Symmetry in ZBrush is in the Transform Menu. Here’s a link to the official documentation, …

Read more

Filed under: Categories 3D Tagged as: Tags

How to apply textures in ZBrush

I was trying to import a texture into ZBrush from an object I had created and UV mapped in Blender. The above shows an example of such an object, looking all nice and dandy in Blender.

However, when I imported it into ZBrush (after figuring out how to do that), I was shocked to see how ZBrush displayed my texture. Take a look:

That’s neither funny nor necessary. I’ve tested the same principle in DAZ Studio, Carrara and Poser and they all played ball, displaying the texture without a hitch. Only Hexagon wanted the texture flipped vertically, but – just like Carrara – offered handy tick boxes as to which direction an imported texture needed to be mirrored.

Zbrush also has such an option, but it’s not next to where you select the texture.

In this article I’ll show you how to import and apply a texture in ZBrush, to an object that has been created and UV mapped in another application. Let’s do this step by step:

Read more

Getting started with ShadowBox in ZBrush

ShadowBox is an interesting feature with which we can create 3D geometry from three intersecting masks. Let’s see how to get started with it step by step in ZBrush 4R7. Select any tool to begin, perhaps something that can serve as a starting point. I’ll use the Dog tool. To do this, hit the COMMA key …

Read more

Filed under: Categories 3D Tagged as: Tags

How to add thickness in ZBrush using Panel Loops

Screen Shot 2016-05-09 at 12.54.35

I have previously shown you how to add thickness to an object using the ZBrush Move Tool. While that method may have had its uses in the past, it is hugely cumbersome and can’t really be used on a complex object.

So today I’ve learnt how to achieve the same thing using something called Panel Loops. It a nutshell, with this feature ZBrush splits the whole model into separate little objects, adds thickness to them and merges if all back together again. It even adds Polygroups for all those little bits too.

Panel Loops can be used to create the backside of an otherwise single sided object (for example, a dress exported from Marvelous Designer).

Let me show you how to use it briefly.

Read more

Filed under: Categories 3D Tagged as: Tags

How to add thickness to an object in ZBrush using the Move Tool

While other 3D apps usually have an option to bring thickness to an otherwise flat object, ZBrush does not. Hurra.

Here’s an extremely fiddly and imprecise way to add thickness to a flat object (such as a 2D plane) using a Morph Target trick I’ve learnt from BadKing the other day.

First, bring in a flat object into your otherwise empty document. The Plane_3D primitive will suffice nicely for this demonstration. Drag it out, enter Edit mode and turn this thing into a PolyMesh 3D.

Turn the object on its side and hit Move (right next to the default Draw).

If you held down SHIFT while looking at the plane from its side, you’ll notice that you don’t see your object anymore – only the Move Tool. That’s just fine. It’s all part of the “fun” of using ZBrush. Have you used the Move Tool before? It takes a bit of getting used to. But I digress…

Click on the little blue circle on the right and you’ll see the tool change, expanding itself to the right. That’s excellent because we’ll move our invisible plane ever so slightly to the right in just a moment.

Screen Shot 2016-04-29 at 17.31.33

So in my screenshot, where the green line is, that’s the side of my plane. Feel free to turn the view around a little so we reveal the plane like so:

Screen Shot 2016-04-29 at 17.35.15

Read more

Filed under: Categories 3D Tagged as: Tags

How to cut holes in ZBrush

Screen Shot 2016-04-27 at 10.52.43

Sometimes we need to cut holes into an object. Every other 3D app under the sun would call this a Boolean Operation – except for ZBrush of course, where this problem is solved with a (totally unintuitive) DynaMesh trick.

While the ZBrush manual mentions that this is easily achieved, they’ve missed out the part on how to actually do it.

Let me explain that here before I forget (which is probably tomorrow).

Read more

Filed under: Categories 3D Tagged as: Tags

How to select multiple parts of a brush in ZBrush

Several brushes in ZBrush insert 3D meshes into your object rather than sculpting it. Some of the default brushes are named IMM in the brush menu, but you can get dozens of others from sites like BadKing.com.au (check it out – they’re phenomenal). IMM stands for Insert Multi Mesh, and such brushes can be created …

Read more

Filed under: Categories 3D Tagged as: Tags ,

How to enable the Magnifying Glass in ZBrush

On some systems it can be hard to read the plethora of menu items that ZBrush presents. It’s hard enough to find the one you need, but it’s even harder to do so without straining your eyes. ZBrush has a lovely solution that can help us, both for modelling and viewing menus: The Magnify Glass …

Read more

Filed under: Categories 3D Tagged as: Tags

How to remove polygons from your model in ZBrush

In Hexagon you can simply select a face (polygon) and hit the delete key, but things are slightly more complicated in ZBrush. Here’s how to remove one or several faces of your 3D object in ZBrush. First, select the desired polygons. In my example above it’s the flat side of a cylinder, so I’m rotating …

Read more

Filed under: Categories 3D Tagged as: Tags

Getting started with the ZModeler in ZBrush

The ZModeler is is a new feature in ZBrush 4R7. With this new gadget we can perform polygonal vertex modelling, something that was not possible before the introduction of this brush. The term “brush” is a tad of an understatement if you ask me: this “minor addition” gives ZBrush abilities that are worth about $1600, which is what …

Read more

Filed under: Categories 3D Tagged as: Tags

Painting textures with 2D tools using ZAppLink in ZBrush

Screen Shot 2014-10-16 at 12.28.24
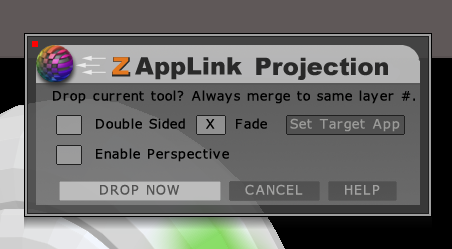
ZAppLink is a ZBrush feature that allows you to use 2D painting tools to paint the texture on a 3D object, as it’s seen in the workspace. Rather than exporting, editing and re-importing textures, drawing on awkwardly layed out UVs, or solely relying on 3D painting tools, you can simply frame your object and draw on it – with anything that supports the PSD file format.

This is different to using GoZ which relies on 3D features of a painting app (such as Photoshop Extended – which I don’t have). ZAppLink allows you to use other 2D tools in your pipeline such as SketchBook Pro, Manga Studio, Corel Painter and many others.

Here’s a quick guide on how to use ZAppLink in ZBrush 4R6.

Read more

Creating UV Maps with UV Master in ZBrush

Screen Shot 2014-10-11 at 12.44.10

UV Unwrapping with conventional tools takes all the fun out of 3D modelling – at least for me. Until I met the UV Master plugin for ZBrush. It can do in less than a second what would take me days in Hexagon or Carrara.

Here’s a quick guide on how to use UV Master in ZBrush 4R6.

Read more

Filed under: Categories 3D Tagged as: Tags

Creating Texture Maps in ZBrush

Import the OBJ file you’d like to create a texture for under Tool – Import. Drag it into the workspace while holding shift, then hit Edit to enter 3D mode. Head over to Tool – Geometry and turn the subdivision level to 1. Texture maps should be created at the lowest subdivision level, even though your ZBrush …

Read more

Filed under: Categories 3D Tagged as: Tags