Photoshop Archives

How to enable that slightly annoying Context Task Bar in Photoshop

A few versions ago Adobe have introduced this floaty little palette in Photoshop. It felt very out of place when I first used it, but might be potentially helpful – if only it wouldn’t constantly get in the way. It’s easy to disable with the three-little-dots menu on the right, whereupon it’ll just disappear and …

Read more

Things I always forget on a fresh installation of Photoshop

Every few years I end up with having to re-create my favourite workspace configuration in Photoshop. Without fail, I forget where some settings are hidden that I’ve grown rather fond of. Here’s a quick refresher about how to change those. Hide those scroll bars By default, the document is surrounded by scroll bars. It’s clutter …

Read more

How to use Emojis and Special Characters in Photoshop

I keep forgetting how to use Emojis in Photoshop. It’s not all that intuitive, so while it’s fresh in my head, let me make a note of it here. This works for both Emojis as well as special characters. The key thing to remember is that an Emoji is just a regular character typed with …

Read more

How to turn Blending Options into independent Layers in Photoshop

Sometimes it can be hand to turn anything that’s created via Blending Options into discreet and separate layers. Things like drop shadows, outer glows, pattern overlays, that sort of thing. That way we can process them separately or make adjustments or erase parts of those constructions that we otherwise couldn’t do. I keep forgetting how …

Read more

How to retain a pixelated retro look when scaling images in Photoshop

I’ve been making some thumbnails for my Stardew Valley streams on YouTube, using low-res pixel artwork to reference the characters. My thumbnails are much larger than the original artwork, so I had to resize them in Photoshop. However, when I did this, I’ve noticed that Photoshop was trying to “smooth” the pixels as good as …

Read more

How to bring back Legacy Shapes in Photoshop

My friends at Adobe have done it again: remove frequently used features from Photoshop and replace them with stuff nobody has ever asked for. Case in point: the terrible default shapes that we’ve had (and disliked) for the last 30 years. I recently made the mistake of updating Photoshop, with the intention of drawing a …

Read more

How to import WebP images into Photoshop

In this episode I’ll show you how to use WebP images in Photoshop. Currently Photoshop (2020) does not have native support for this file format, so we’ll need a plugin made by the developers (Google) to make it happen. It’s aptly titled WebPShop. While the code is open source, it’s not immediately obvious to non-hackers …

Read more

Upscaling while preserving details in Photoshop

I’ve received a great tip from Patrick Schoolderman a couple of weeks ago, about how to upscale images in Photoshop with a new algorithm that Adobe call Preserve Details 2.0. I wanted to make a quick note about how to do this and share it with you. The workflow is as simple as opening your …

Read more

How to switch Photoshop from Timecode to Frames

The Photoshop Timeline is a mysterious tool. You can open it from Window – Timeline, or you can open an image sequence/video clip and it’ll dock itself at the bottom of the viewport. By default it displays a sequence in a timecode of sorts, but it’s not the SMPTE or EBU timecode we’ve come to know and love. Instead, it’s something along the lines of seconds and frames, in a format like 02:02f or in other words, something NOBODY in the world would ever use.

But hey, they’re Adobe, and by default they can do anything they want (while extorting money from casual users). I don’t use Photoshop for physical film or video editing, but it’s a nice tool to have when converting rendered image sequences into video clips. I’ve described how to do this here.

When I work this way, I’m more interested in the frame count rather than some made up timecode-thing. I’ve found out how to change this in Photoshop CC, and thought I’d share it with you.

Read more

Creating Depth of Field in Photoshop

In this episode I’ll show you how to create an artificial depth of field effect in Photoshop, using the Blur Gallery. This can be useful for cutting down on render time, or to apply to images that have been taken with small fixed focus cameras (like the GoPro). This technique is similar in style to …

Read more

Creating a round cutout mask for OBS Studio

I like the way my PlayStation 4 adds a soft round cutout mask to the PlayStation Camera Feed when streaming gameplay. I wondered how I could best recreate this effect in OBS Studio for a consistent experience, no matter which device I decide to stream from.

Here’s how I did it, with a little help from Photoshop – feel free to use the resulting asset without any need for further fiddling.

You can download the mask further down (anchor link).

Read more

Creating a Zoom Blur Effect in Photshop

In this episode I’ll show you how to create a moving Zoom Effect in Photoshop, using the Radial Blur Filter. I’ll also explain the use of Smart Objects and how to blend the original image with the blurred version using a Layer Mask. I’ve used this effect to create the thumbnail for my Vertigo Shot …

Read more

How to turn a Raster Image into a vectorised SVG in Photoshop

The other day I wanted to convert a logo into a path, so that I could use it as a shape in Blender. It was in fact the WordPress logo that was provided as a PNG or PDF from the WordPress Branding section.

The trouble was, both the PNG and the PDF are rasterised, and as such cannot easily be used for an extrusion in 3D as an SVG file would. The question then was, how do I convert an image into an SVG in Photoshop, so that I could import it into Blender?

It took a bit of fiddling, but here’s how I did it.

Quick introduction to SVG Files

SVG files can actually contain three types of data:

  • Vector Graphics, such as paths (which is what we want)
  • Raster Graphics, such as bitmap images (which we have, but don’t want)
  • and Fonts

What I needed in Blender was indeed a Vector Path. Although the other two data types can be contained in an SVG file, Blender can only read path information at the time of writing. It makes sense too, because really I’d like to the path information available as a curve in Blender, not the potential raster or font information.

I’m mentioning this here because

  • a.) I didn’t know this, and
  • b.) importing an SVG containing either fonts or raster graphics will import nothing into Blender – which had me stumped.

Thanks to cegaton on Blender Stackexchange for this explanation!

Hence, for Photoshop to export vector data instead of raster data in our SVG file, we need to jump through a few hoops – but it is possible. Let’s see how!

Read more

How to pixelate text in Photoshop

In this screencast I’ll demonstrate how to pixelate or obfuscate text in Photoshop. I usually use Skitch for such things, but one day it wasn’t working, and all I had to hand was Photoshop – so I hunted around and found that it works just as well. It’s just knowing what to click. Once I …

Read more

How to create a Bokeh Effect in Photoshop

Photoshop has an interesting set of filters that let us turn ordinary images into fascinating Bokeh Effects. Those can be useful as a nice alternative for gradient backgrounds due to the elements of randomness they can bring, or for foreground effects akin to those created with plastic cameras. 

The above uses a Bokeh Effect as additional foreground pattern. Let’s see how it’s done.

Read more

How to open and convert multiple raw images in Photoshop

Opening several JPG or PNG images in Photoshop is the easiest thing in the world: just select several in the Windows Explorer or in the Mac Finder, right-click to choose Open, and Photoshop brings in each image as a new document.

But when we try the same with raw images, it won’t work: although Photoshop shows us the raw processing dialogue for all our chosen images, and lets us make individual changes, as soon as we hit Open at the bottom, only the current image is opened as a new document.

What gives? How can we open and convert several images at once?

Read more

How to draw with an image in Photoshop

Sometimes we want to reproduce an image using a brush stroke. It’s a handy way to replicate a 2D object along a path for example. Using the standard brush for this though, we’ll find that we can only reproduce a single colour image. But what if we want to reproduce all colours in our image?

Enter the Mixer Brush Tool. Here’s how to sample an image and draw with it in Photoshop.

Read more

How to create a drape effect in Photoshop

It’s easy to create an effect of draped cloth in Photoshop, like in the image above. We can do this with the Gradient Tool. It’s the icon with an actual gradient on it, sometimes hiding behind the Paint Bucket or 3D Material Drop tool (if you don’t see it, left-click and hold for about one …

Read more

Combining a DAZ Studio Render and a background image in Photoshop

In this episode I’ll show you how to render an image in DAZ Studio and compose it onto a background image in Photoshop. We’ll use the Shader Mixer and a Shadow Catcher to make the figure cast a shadow but be otherwise transparent in DAZ Studio. In Photoshop we’ll add artificial depth of field to …

Read more

How to render an image sequence as video in Photoshop

Up until now I had always used Premiere Pro to assemble image sequences of a rendered animation.

I’m still using Premiere Pro CS 5.5 and I’m not currently subscribing to the whole Creative Cloud package. As such, my version of Premiere is stuck somewhere in the past, when 4K was barely an idea, and 1080p was the highest result you would ever need.

The trouble is, I was working on an animation whose resolution was larger than 1920×1080. While Premiere Pro CS 5.5 can handle this and higher resolutions for editing, there doesn’t seem a way to export it at anything above 1920×1080.

My editing needs were moderate at best: assemble 250 frames, repeat those several times, and add a fade to black either end. Which application would be capable of doing this swiftly and efficiently, I wondered?

Photoshop CC can do it! Would you believe it? Here’s how.

Read more

How to use the Seletion Brush in Photoshop

screen-shot-2016-10-09-at-14-31-03Manga Studio has a really nice feature that I have been looking for in Photoshop for some time: a Selection Brush.

In addition to the usual lasso, marquee and Magic Wand tools, there is a way to simply paint over a part of your image, which then becomes part of (or reduces) the current selection.

Turns out this feature (and then some) is part of Photoshop too – it’s just not called a Selection Brush. Although from what I understand, there is such a feature in Photoshop Elements (a different product entirely).

In Photoshop, this tool is called the Quick Mask feature. It’s dead simple and extremely versatile. What’s not to like? Here’s how to use it:

  • either, head over to Select – Edit in Quick Mask Mode
  • or simply hit the keyboard shortcut Q to toggle the feature on or off

Read more

How to get rid of that scary blue line in Photoshop

screen-shot-2016-10-06-at-11-08-37
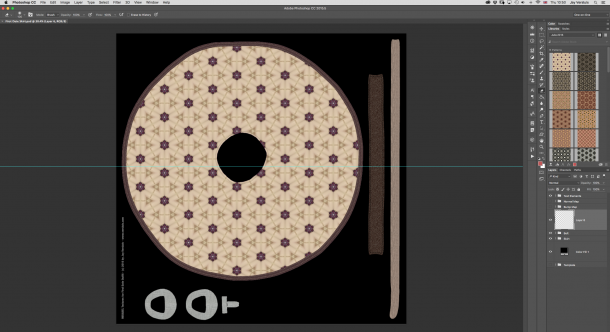
I was doodling away in Photoshop, one hand on the keyboard and the other using my Wacom pen, when out of a sudden this crazy cyan blue line appeared right across my canvas. Super annoying!

My Intuos tablet has a mind of its own sometimes, selecting things that I don’t want, and perhaps this was one of those occasions. Or perhaps I had accidentally hit one of the gazillion keyboard shortcuts that does something I didn’t even know Photoshop could do. Who knows.

Either way, I had an ultra annoying line across my document, and there didn’t seem to be a way to get rid of it. Here’s what it looked like:screen-shot-2016-10-06-at-10-50-08


Moving the document also moves the line, so it had to be something that could be turned off. But how?

Read more

How to open multiple images as layers in Photoshop

Did you know there is a way to open several images in the same document as layers in Photoshop? It’s a real timesaver if you have several renders that all need to be composited onto the same background for postwork. It’s really easy to do: open Photoshop (duh!) head over to Scripts – Add Files to …

Read more

How to create a HDRI image in Photoshop

Photoshop CC 25yrsPhotoshop can combine multiple images into one and save them as HDRI, which allows us to use them in our 3D renders – either as 360 degree backgrounds or as light sources.

The way to do it has changed several times over the years – so here’s how this works in Photoshop CC 2015.

Read more