Jay is a medical miracle known as Super Survivor. He runs several YouTube channels and websites, and he's also live on Twitch sometimes. To support him on his mission to make the world a better place, you can support him on Patreon or buy him a coffee.
Groups are helpful to keep the many items in your scene organised and grouped together. They’re like a “folder”, even though you’re not really moving items to another place. They just appear together with a heading and a disclosure triangle. For example, rather than having a character and five independent clothing items, it’ll be much …
You want to make a quick change to a 3rd party vertex object in Carrara, head over to the Modelling Room, but all your favourite tools are greyed out. What’s going on? Carrara has a feature called Protect Topology, and there’s a good chance it’s switched on for items you bought from a marketplace. It’s …
Carrara lets you turn any object in your scene into a Soft Body object with the help of a Soft Body Modifier. To create a waving flag we need to use a combination of two modifiers: one that makes the object a “soft body”, and one that attaches it to something else, such as a …
DAZ Studio has one drastic drawback: while you’re rendering a scene you can’t use the app until it’s finished rendering. In fact, DAZ Studio makes use of every available CPU cycle, turning even the fastest computer into something you can’t even check your emails with while you wait for that render to finish.
That’s great for efficiency – but it also sucks because you need a second computer to keep working with, or alternatively use a second computer for rendering while you work with your main machine. Wouldn’t it be great if you could do something akin to Poser’s background rendering, something that lets you setup the next scene in DAZ Studio while it’s rendering at the same time?
I have good news: you can – thanks to something called RIB files. I didn’t know this until recently, and it works a treat. Let me explain how to use this feature.
Photoshop has a feature called Clipping Layers. It’s extremely useful, but doesn’t quite describe what it does. Besides it’s extremely unintuitive if you’ve never used it before. Among other things it can be used to add an effect to a single layer rather than the entire image, as you would if an adjustment layer is …
One morning I woke up and my entire Smart Content tab in DAZ Studio was empty. Nothing had happened since the day before when it was working perfectly fine. It just stopped working overnight.
What I had done shortly before going to bed was to install the latest service release of Poser Game Dev (SR5). If this was the cause of the problem or not will forever remain a mystery. In this article I’ll explain how I fixed this issue on my Mac.
Poser is a tad – shall we say – pernickety about where it allows you to save files if you’d like them to appear in the Library. You can save files anywhere on your system of course, using the options in the File Menu, but Poser can also save files into the Library with the …
Other 3D apps rotate around the currently selected object by default. Poser does not. By default Poser chooses to rotate around the center of the universe. That’s great for characters but relatively maddening for larger scenes. The secret lies in the Display menu, in an option called Orbit Selected Mode. Select it and Poser will rotate around your …
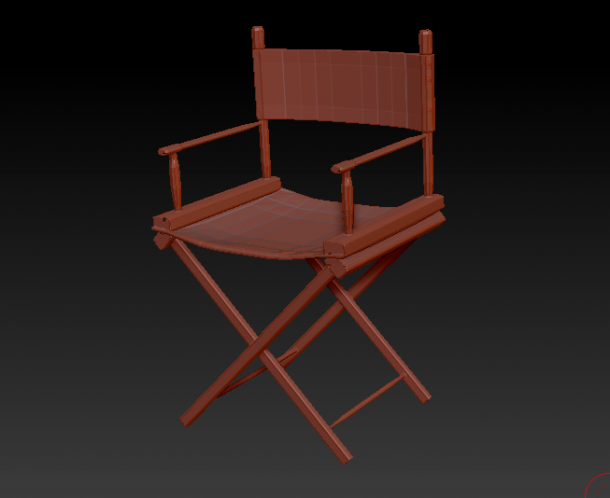
Poser can two two types of Motion Blur effects: 3D Motion Blur as seen above, and 2D Motion Blur. The latter is more of a “preview” mode rather than the real thing. Motion Blur can be used on both still images to convey the idea that something is moving, as well as in animations.
A few years ago I bought Prostudio by Synthetic and Blackhearted. It’s a “light preset kit” for Poser that comes with an extensive manual and many presets to start a good render, but as the author explains you really need to know something about lighting to make renders look their best. After reading the manual I took …
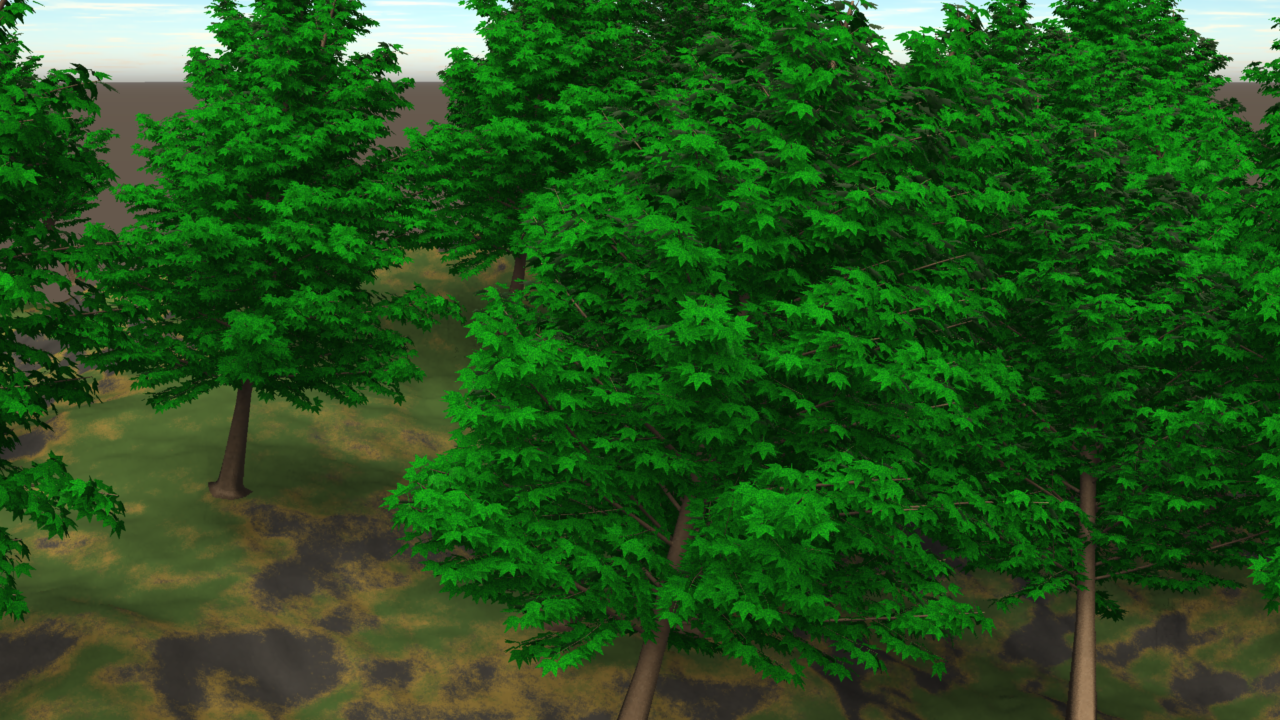
Replicators and Surface Replicators allow you to duplicate single objects and make it look like you have an armada of “stuff” in your scene. For example, you could replicate trees on a landscape or a group of people, but only load a single object into your scene.
The difference between a Replicator and a Surface Replicator is this: Replicators duplicate (replicate) your objects along all 3 axis and only need a single source object. In fact they can accommodate several source objects, but they don’t replicate along anything.
Surface Replicators on the other hand only replicate along a given surface, like a terrain or another object. Surface Replicators only obey a twi dimensional plane along whose normals your replicated objects will be aligned.
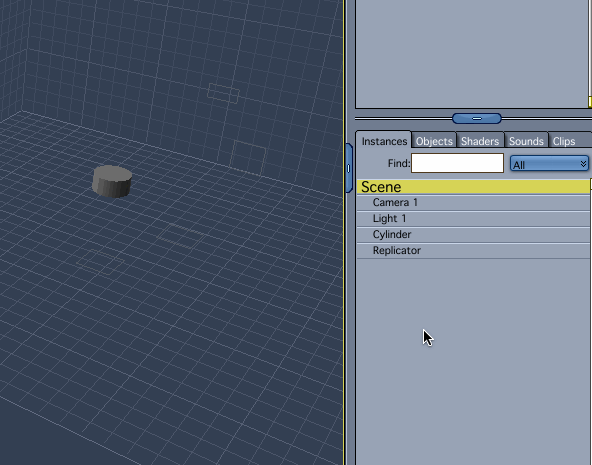
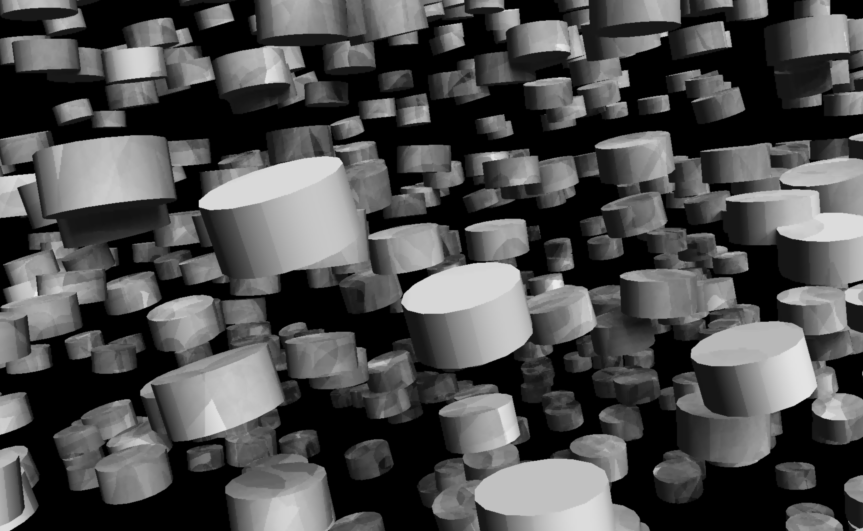
To use them, simply drag an object onto the replicator in the Assemble Room. This can be tricky: make sure the source object turns green rather than yellow – which seems to happen when you drag it too far towards the right. Click and drag it further to the left, as shown below.
As soon as you do, you’ll see your object outlined many times over in the scene as bounding boxes.
To adjust the replicator, select it and click the Wrench Icon to enter the Modelling Room. Here you can tweak the behaviour of your Replicator: along which axis you’d like to replicate how many objects, if you’d like to add some distance or rotational changes to it, that sort of thing.
You can also add other source objects here if you would like them to have the same behaviour (in case you don’t like the drag and drop action described earlier).
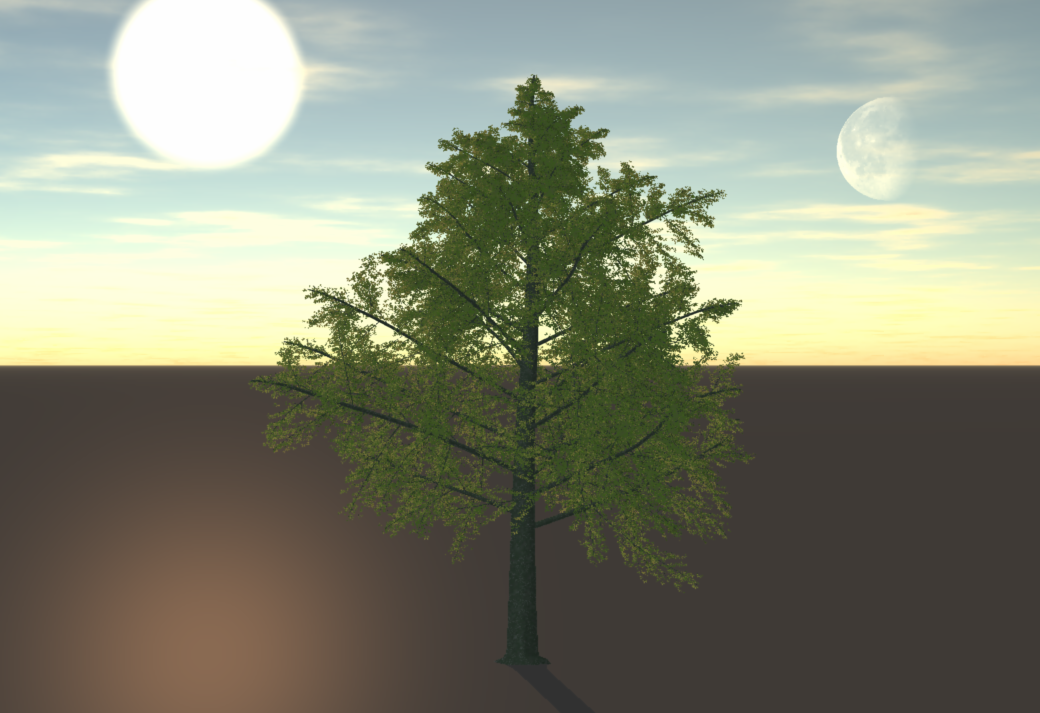
Carrara has a very cool sunlight / moonlight feature that comes as part of the Realistic Sky option. With it you can transform your default distant light into the sun or the moon and reposition it in your scene.
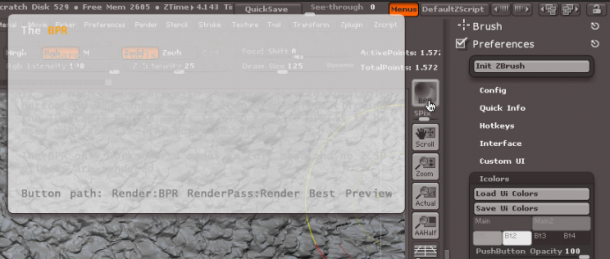
The Bristle Brush preview in Photoshop is great if you have a large screen, but on smaller setups it can get annoying. It’s easy to switch off if you know where to look. Let me show you where that is: Head over to Window – Brush (or Window – Brush Presets). A window opens which …
Morph Targets are these little sliders in 3D objects that can move geometry without changing it. For example a door can open and close, or a character can open and close their eyes. To create one in Carrara, head over to the Vertex Modelling room and select an area in which you’d like to create …
Many features from Hexagon have been ported over to Carrara, but not all of them are obvious and easy to find for Hexagon users. Here are my favourite features from Hexagon, and how to access them in Carrara: Tweak / Stretch Tool The one Hexagon tool I was missing most was Vertex Modelling – …
Over the last few months I was considering buying a Mac Mini. I’m currently using my high-spec MacBook Pro 2.8GHz Dual Core i7 on a 27′ Thunderbolt Display, but it’s awkward to unplug every time I want to use it as a laptop. The Mac Mini would streamline my desk and add some more power to those 3D apps I’m using.
Or so I thought.
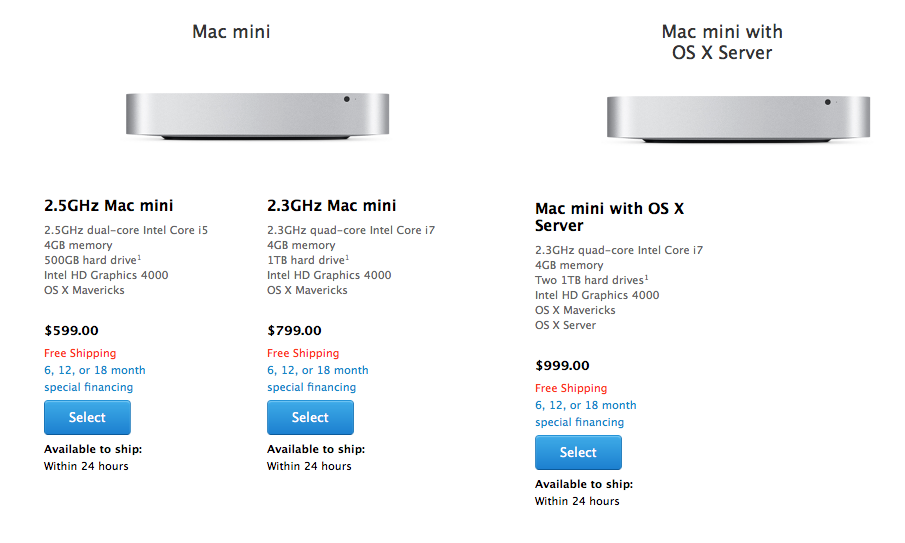
When the refreshed 2014 Mac Mini line was introduced this week I couldn’t quite believe my eyes: Appe have made the little guy much slower than his predecessors!
Granted, the graphics card is better, the IO ports are faster – but the Firewire 800 port has been removed – which is not such good news for video editors. And in terms of processing power, all we can get now are Dual Core i5 models which are slower than my current 3yr old laptop. The 2012 models featured Quad Core i7’s at 2.3GHz, something I had really looked forward to.
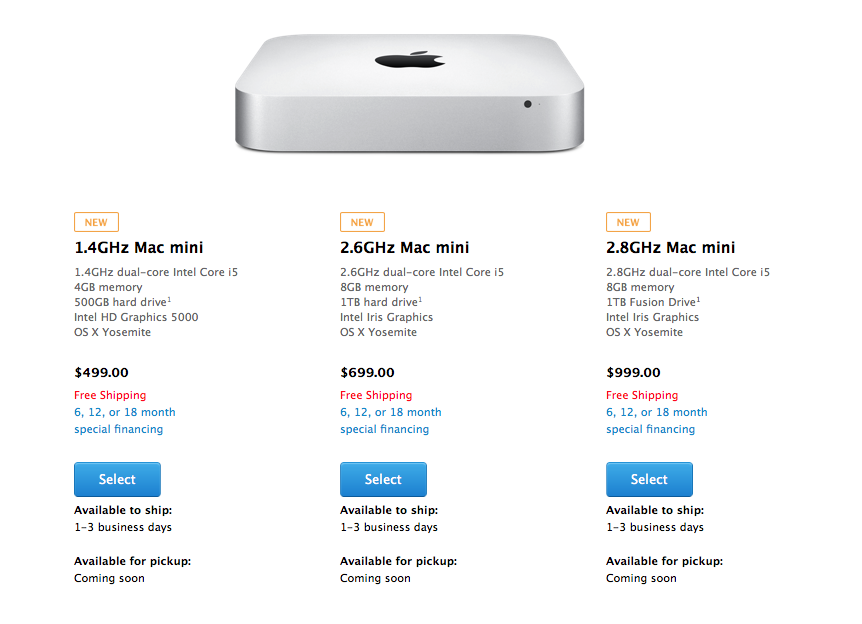
The Mac Mini 2012 lineup wasn’t bad at all
For many buyers the Mac Mini was a cheaper alternative to the overpriced Mac Pro: get the medium model, increase the RAM, replace the 1TB drive with an SSD, and for about $1000 you’ve got a super small desktop with more processing power than most people know what to do with.
It was a blessing for professionals: You could buy 4 such machines for the same money as a single Mac Pro which is less than twice as fast.
Apple aren’t stupid. They know this too. Notice that the current line-up of Mac Mini’s no longer includes a Server model, probably because nobody ever bought it. Buyers like me would opt instead for the $200 cheaper model with an empty hard drive slot, ready for aftermarket goodies.
Perhaps such a powerful 2012 Mac Mini was hurting Mac Pro and iMac sales, and I guess the decision was made to relegate the Mini to be a cheap “web and email machine”. No professional should ever look at it again.
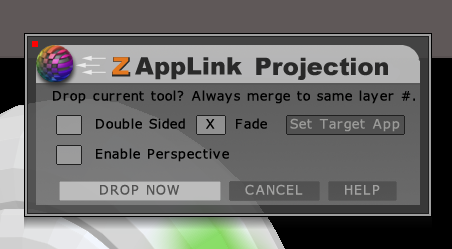
ZAppLink is a ZBrush feature that allows you to use 2D painting tools to paint the texture on a 3D object, as it’s seen in the workspace. Rather than exporting, editing and re-importing textures, drawing on awkwardly layed out UVs, or solely relying on 3D painting tools, you can simply frame your object and draw on it – with anything that supports the PSD file format.
This is different to using GoZ which relies on 3D features of a painting app (such as Photoshop Extended – which I don’t have). ZAppLink allows you to use other 2D tools in your pipeline such as SketchBook Pro, Manga Studio, Corel Painter and many others.
Here’s a quick guide on how to use ZAppLink in ZBrush 4R6.
To close a Vertex Object, first select the edges around the opening. In this example it’s a sphere with its top sliced off. Now head over to Model – Fill Polygon. It’s equivalent to the Close function in Hexagon. Empty Polygon on the other hand will remove the polygon, much like pressing the Delete key …
DAZ Studio Pro 4.6 runs perfectly fine on the Microsoft Surface Pro, however by default the stylus navigation isn’t working well: the pen is so sensitive that it has your scene spinning into al kinds of directions at the slightest touch on the navigation cube at the top right. Other 3D applications are working fine …
UV Unwrapping with conventional tools takes all the fun out of 3D modelling – at least for me. Until I met the UV Master plugin for ZBrush. It can do in less than a second what would take me days in Hexagon or Carrara.
Here’s a quick guide on how to use UV Master in ZBrush 4R6.
Import the OBJ file you’d like to create a texture for under Tool – Import. Drag it into the workspace while holding shift, then hit Edit to enter 3D mode. Head over to Tool – Geometry and turn the subdivision level to 1. Texture maps should be created at the lowest subdivision level, even though your ZBrush …
GoZ (pronounced Go-Zeeh) is a bridge between ZBrush and other applications. This allows for easy mesh and texture sharing between ZBrush and Sculptris, Photoshop, Poser, Carrara, DAZ Studio and many others. But how do we use it? Where is that magic button? And how do we select the target app? All will be revealed in this article. Under …
I’ve encountered a problem last year that every time I tried to send something from ZBrush to another application via the GoZ plugin, my Mac gave an error message telling me I had “insufficient disk space”. With over 100GB left on my main drive this is a plain lie. Turns out that there’s a permissions problem …
ZBrush doesn’t have a User Manual in PDF form you can download and curl up with. Instead, it has an online version over here.
ZBrush also encourages us to use the integrated help which explains every feature of the app. All we have to do is press CTRL / CMD while hovering over an item in its extensive menu.
Trouble is, when I do this on my Mac, I can barely read anything – if at all. You’d expect that an $800 piece of software would at least WORK out of the box without extensive digging into how to make the friggin help show up. But of course that’s not how it works with ZBrush.
Lucky for us the entire UI is customisable (albeit a tad difficult to understand how), and thanks to MentalFrog’s suggestion I could tweak my ZBrush popup help from “totally irrelevant” to “actually usable”. Let me show you how.
Much like a drawing programme, it is more or less required to use a Wacom tablet with ZBrush. Without one it doesn’t really make much sense. Like the rest of this weird piece of software, navigating around an object in 3D is completely different than in any other application. My Wacom Intuos 4 is setup …
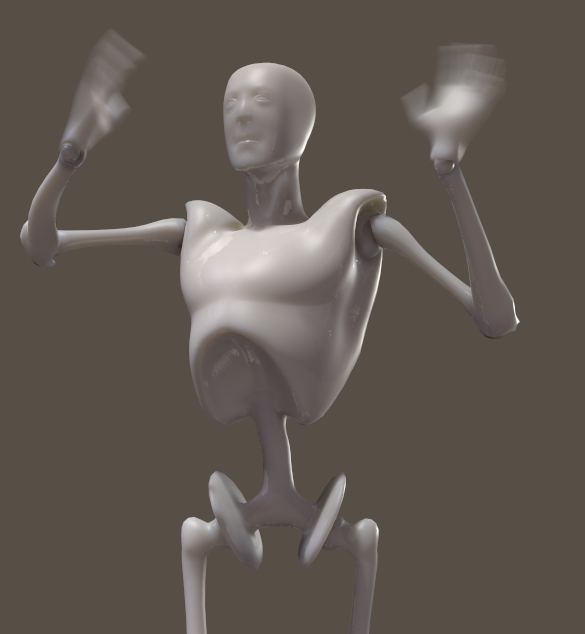
A Motion Path is a line in 3D space which an object can follow over time. Each path is specific to an object. This is useful for creating animations and is an alternative to keyframing motion. In the above animation I’ve applied a Motion Path to the camera and made it fly through Greeble City. …
Since I bought the Microsoft Touch Keyboard for my 1st Generation Surface Pro, 3D usage has become even better than before (I went for the purple one). Many functions have keyboard shortcuts that make life quicker and easier when it comes to navigating a scene in 3D Space. Before I forget how this works, I …
Carrara has a built-in physics engine which is very capable of calculating dynamic animations. Here’s how to setup a basic scene with physics. Physics are already setup in every new scene with a default gravity. Feel free to change the Simulation Accuracy and Geometric Fidelity different results before messing with each single object. You can find …
To use Image Based Lighting in Carrara (IBL for short), we need a HDRI map (High Dynamic Rage Image). Using this technique your scene is not illuminated by light sources but rather by a weird looking image. This concept is known as Global Illumination and the results can be stunning (see above). In principle, a spherical …
In Poser we have the ability to add and remove entire runtimes, save new items to those, delete them if and when we like, and we can also create folders inside our runtimes. We can remove items, but it seems we can’t remove folders – not even if they’re empty. This can get messy. According …
 ZAppLink is a ZBrush feature that allows you to use 2D painting tools to paint the texture on a 3D object, as it’s seen in the workspace. Rather than exporting, editing and re-importing textures, drawing on awkwardly layed out UVs, or solely relying on 3D painting tools, you can simply frame your object and draw on it – with anything that supports the PSD file format.